CVEDIA-RT Plugin for Piko - Configuration Guide
This guide is designed for users responsible for configuring analytics settings, managing detection parameters, and setting up the CVEDIA-RT plugin.
Key Features
Standard Security Features
Detects people, vehicles, and animals within a variety of surveillance use cases:
- Intrusion detection
- Area enter/exit
- Loitering
- Object guarding
- Object left behind
- Crowding
- Tailgating
- Line crossing
Enhanced Appearance Search
Advanced object classification is available for retrospective search and metadata filtering:
- Vehicle: Door open, Lights On, License Plate (searchable), Color, Type
- People: Gender, Wearing Glasses, Age, Using phone, Carrying bag, Smoking, Face covered, Requires assistance, Upper clothing color, Lower clothing color, Has Tattoo, Surrender pose
- Animal: Species (bear, elephant, wolf, cat, dog, bird, deer)
Premium Features
Specialized analytics that provide enhanced situation context and assist in identifying high-priority events.
- Armed Person Intrusion
- Fallen Person Detection (Slip & Fall)
- ALPR (Automatic License Plate Recognition)
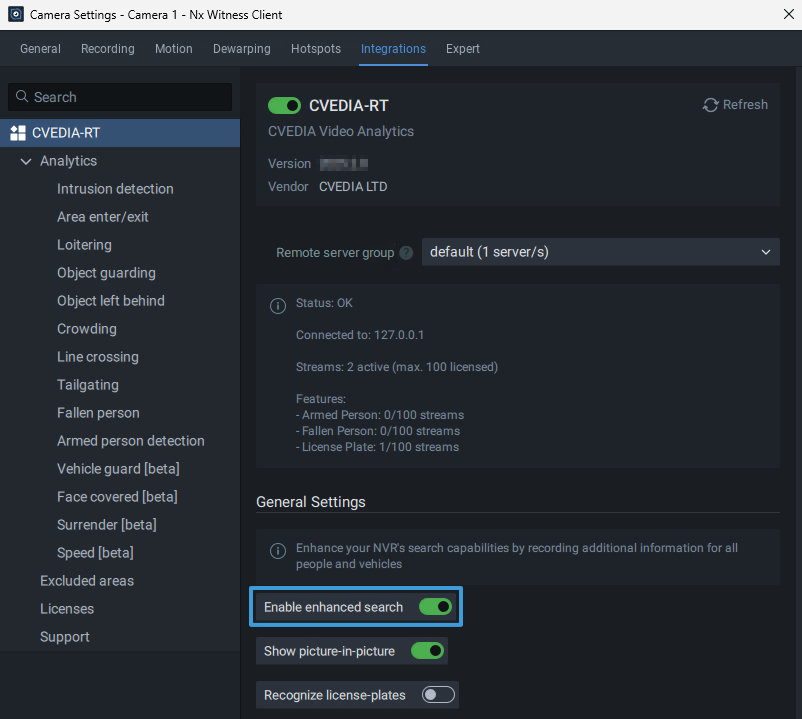
Plugin Activation
To configure analytics, you need to first activate the analytics on the camera you want to use with the CVEDIA-RT plugin:
-
Right-click on a connected camera or a video stream and select "Camera Settings."

-
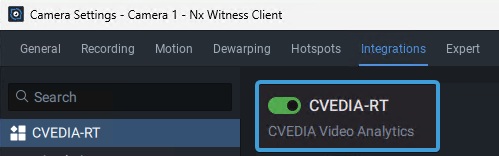
Navigate to the Integrations/Plugins section of the Camera Settings window, select and enable the plugin.
Important
Click the "Apply" button before proceeding with any further configuration.
Notes
- Analytics work only when the camera is being viewed or recording is enabled.
- If you don't see the toggle to enable the plugin right away, please click on CVEDIA-RT title on the left sidebar first.
Analytics Configuration
Different types of analytics allow you to configure one or more detection areas or lines, choose the types of objects to detect, and select additional related parameters.
Notes
- Analytics are active only if at least one area or one line is defined, or when License Plate Recognition or Enhanced Search features are enabled.
- Please note that you can enable multiple area or line based analytics at the same time. This will not impact the performance of the system.
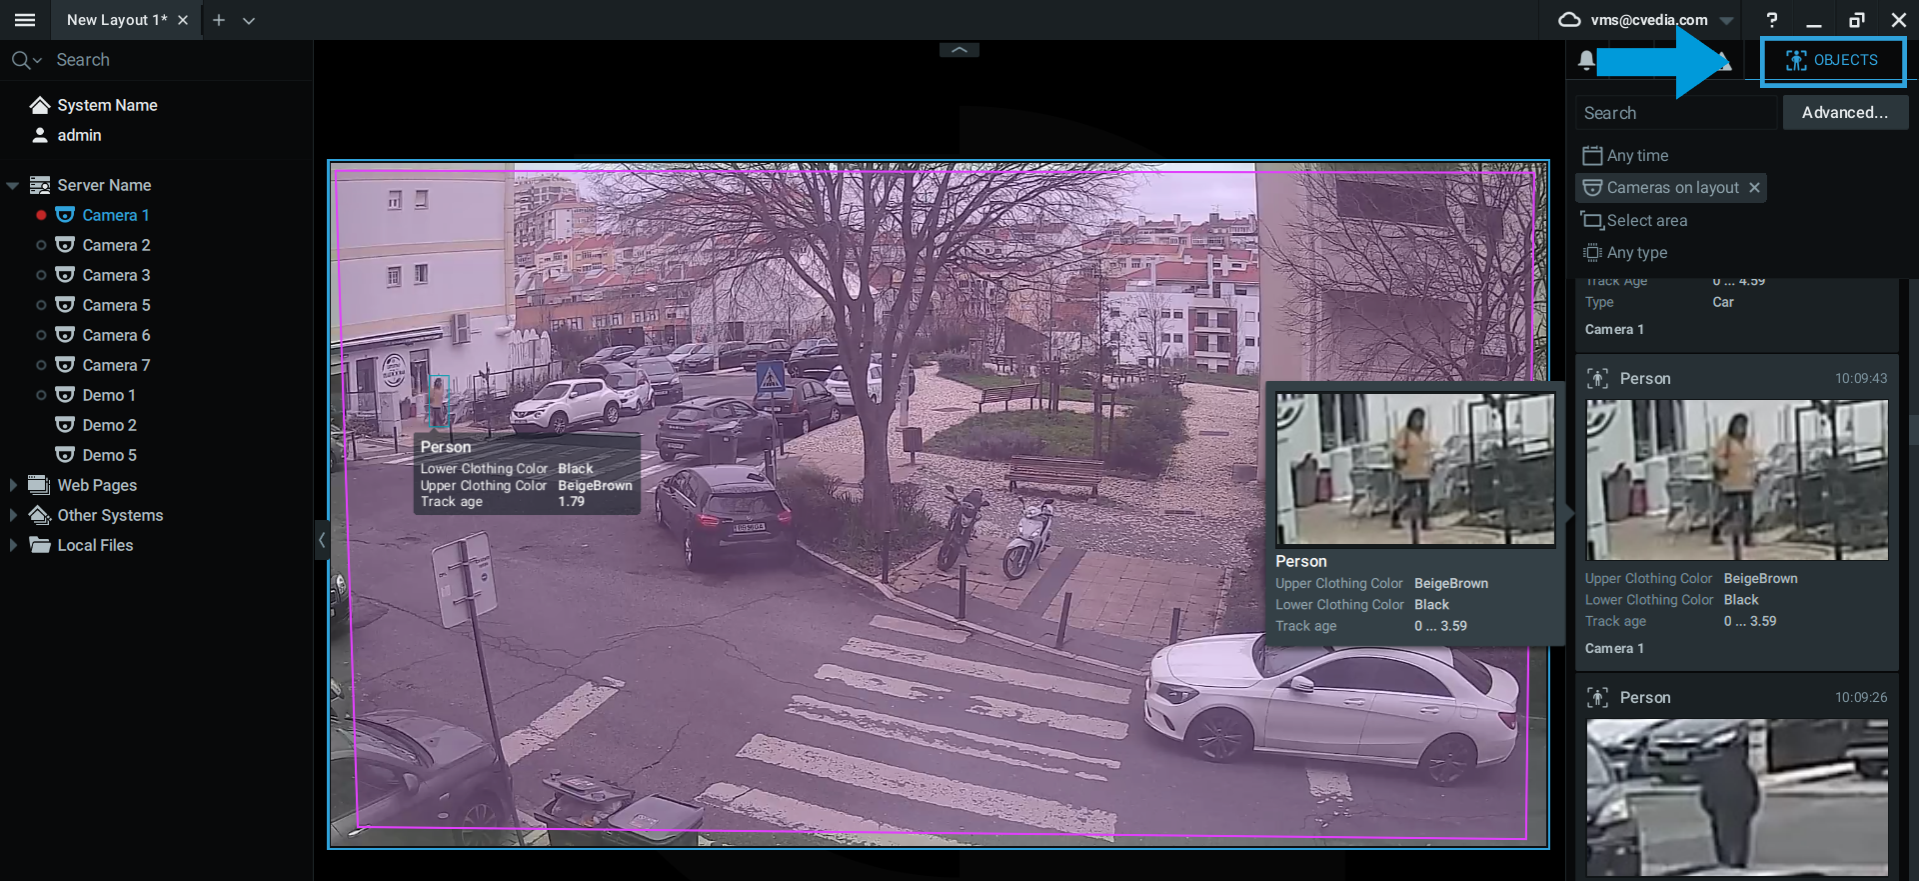
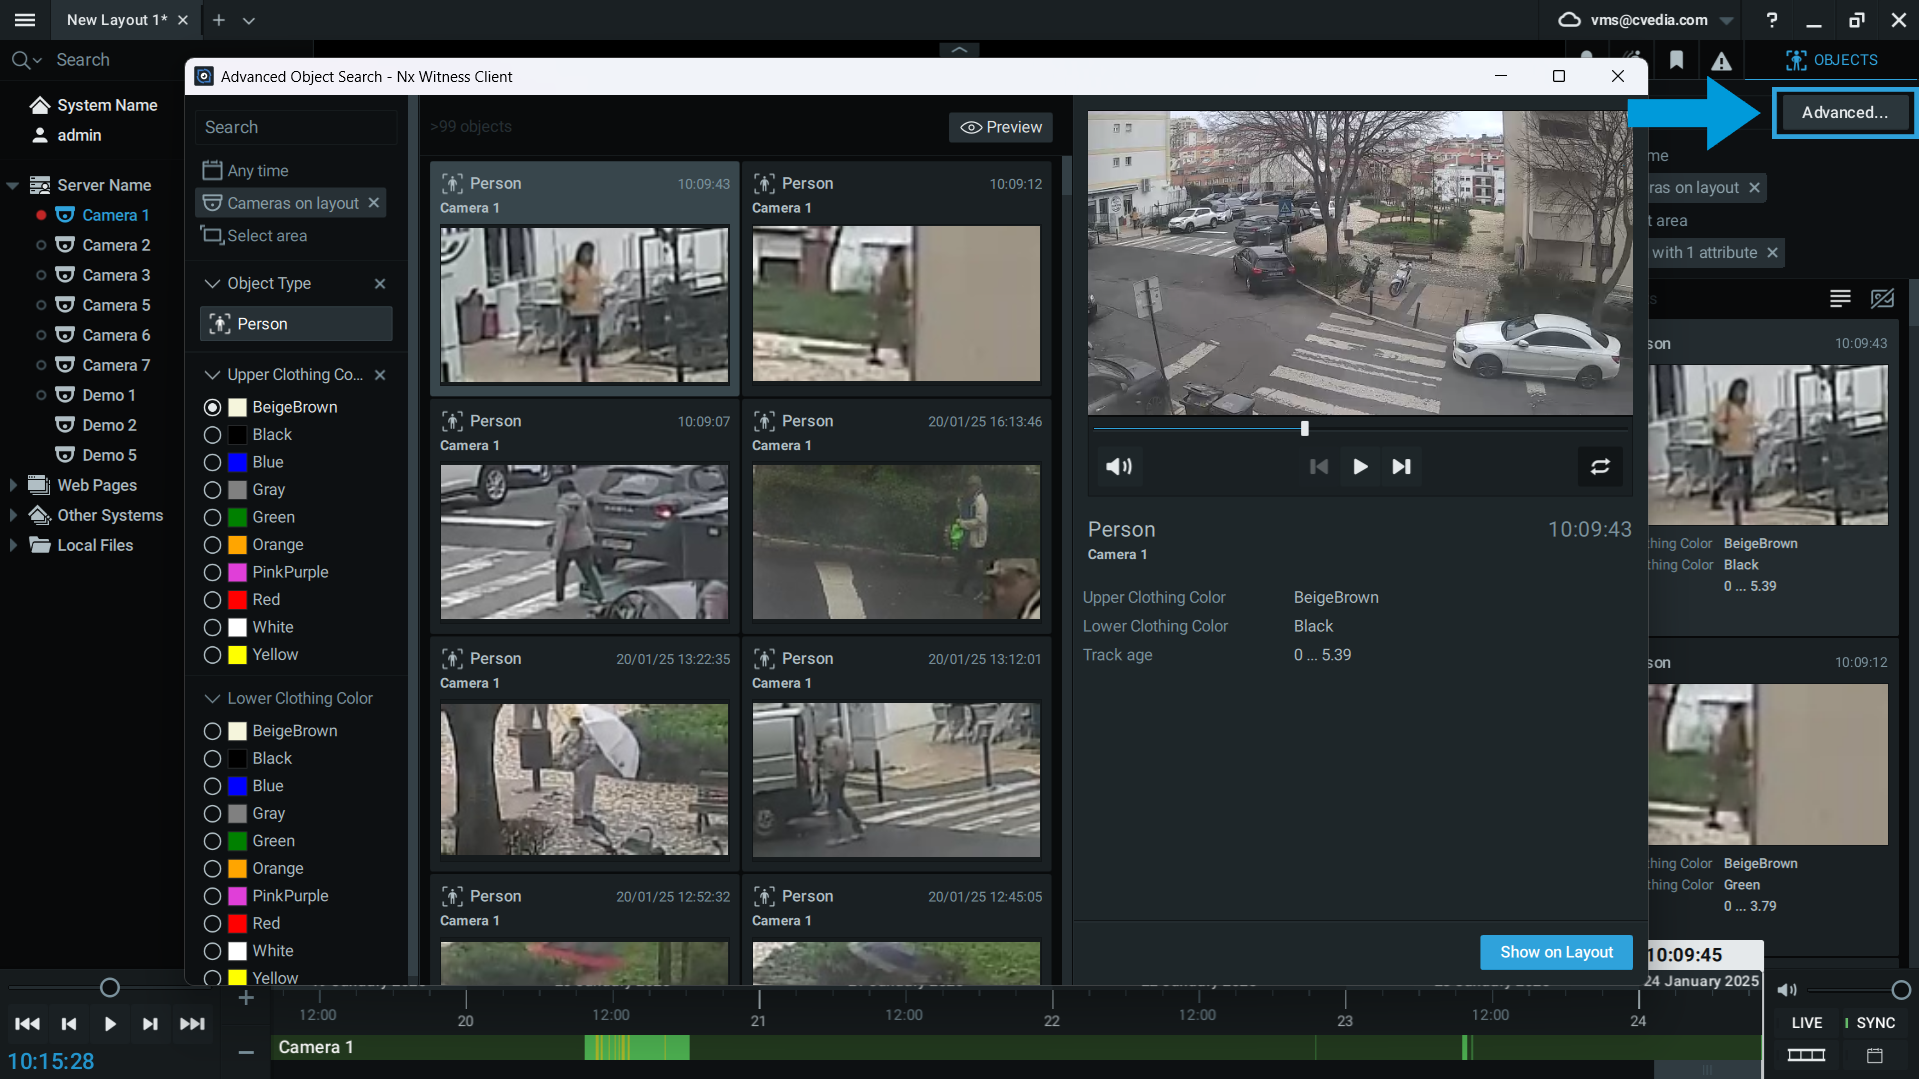
View detected objects
To view the detected objects, you will first need to configure one or more analytics on the camera, as described in details below.
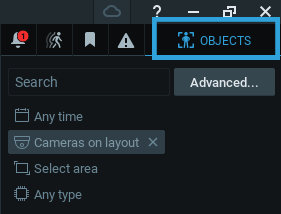
Once you have configured the analytics, you can view the detected objects in the Nx Witness Client by selecting the "OBJECTS" tab. This view will also display the bounding boxes around the detected objects, as well as the object type and the object attributes (such as color for vehicles and clothing color for people).
Analytics Events
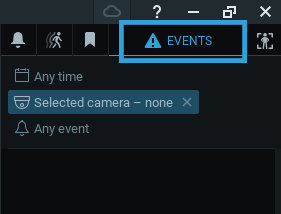
Each analytic can generate events that can be monitored in the Nx Witness Client. The events are displayed in the "EVENTS" tab.
The events can be used to trigger actions, such as sending notifications, playing sounds, or creating bookmarks.
To preview events, you need to use them in the camera rules in Nx Witness as described below.
Info
- The events are generated only when the camera is being viewed or recording is enabled.
- The events are generated only for the objects that were detected in the configured areas or lines.
- The image of the event may not represent the exact moment when the event was triggered. The system shows the best available crop based on the object size and detection confidence level, to prevent showing occluded or partially cut objects.
Learn More
Visit the official Nx Witness VMS guide: https://networkoptix.com/files/help/default/⅔/index.html to learn more about creating rules and monitoring events.
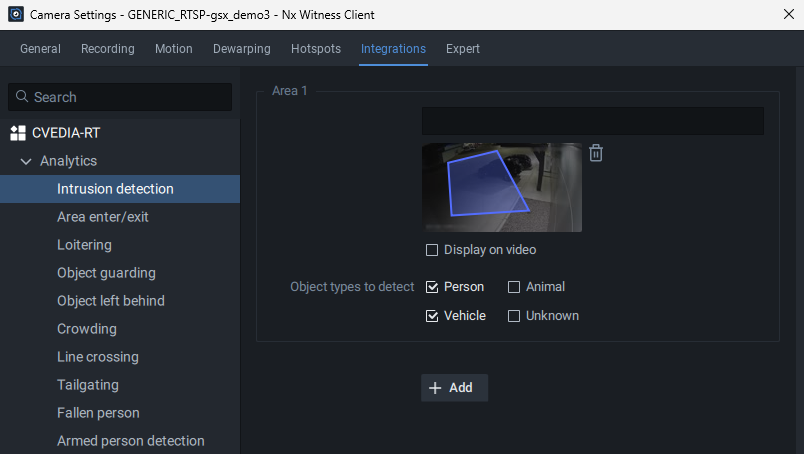
Intrusion Detection
Detects objects that move inside a defined intrusion area. The event is triggered for any new target object (person, vehicle, animal) entering the area.
Configuration steps
- Navigate to Camera Settings > Plugins > CVEDIA-RT > Intrusion Detection.
- Click directly on the image under "Intrusion area 1" to define the intrusion detection zone. Draw a custom polygon to encompass the area for intrusion detection.
- Tick the "Display on Video" box to visualize the defined area on the live video stream.
- Select the different Object Types (person, vehicle, animal, unknown) that you would like to detect within each defined area.
- Additional zones can be defined by clicking "+ Add". Draw a different polygon under "Intrusion area 2" if necessary.
Area Enter/Exit
Detects objects that enter/exit a defined area. This analytic can be employed to monitor objects detected in the area without triggering an intrusion event.
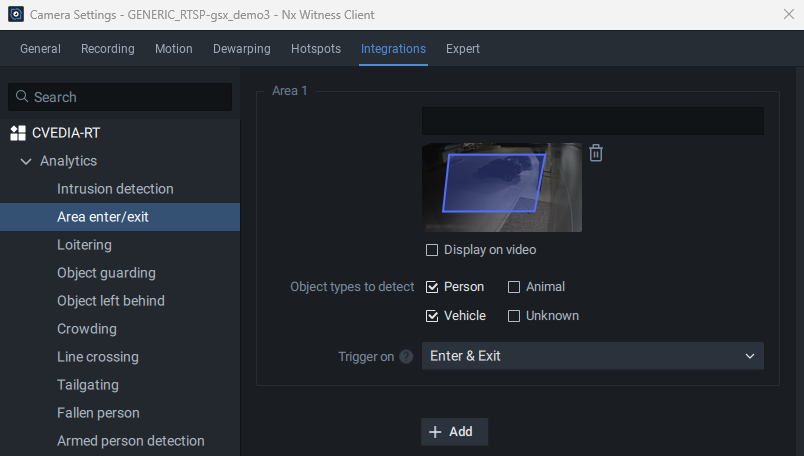
Configuration steps
- Navigate to Camera Settings > Plugins > CVEDIA-RT > Area Enter/Exit.
- Click directly on the image under "Area 1" to define the zone. Draw a custom polygon to encompass the area for object detection.
- Tick the "Display on Video" box to visualize the defined area on the live video stream.
- Select the different Object Types (person, vehicle, animal, unknown) that you would like to detect within each defined area.
- Select which event to trigger - Enter & Exit, Enter Only & Exit Only.
- Additional zones can be defined by clicking "+ Add". Draw a different polygon under "Area 2" if necessary.
Loitering
Detects objects that stay in the defined area longer than a specified time. By default, an event will be triggered when a target object remains in the area for a duration of 10 seconds.
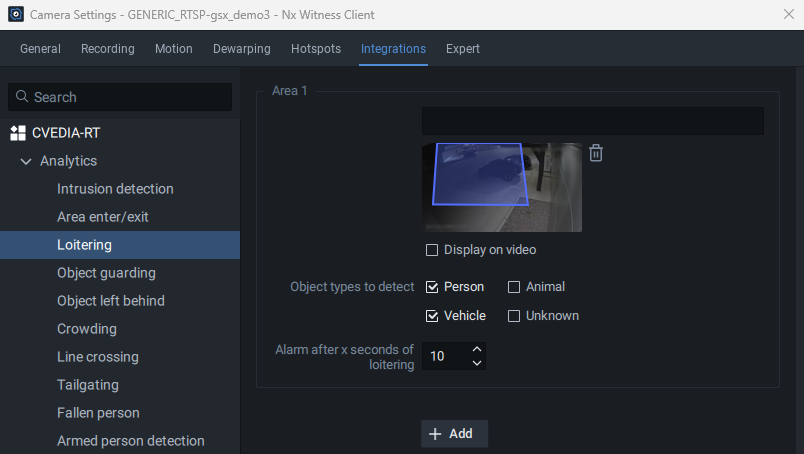
Configuration steps
- Navigate to Camera Settings > Plugins > CVEDIA-RT > Loitering.
- Click directly on the image under "Area 1" to define the zone. Draw a custom polygon to encompass the area for object detection.
- Tick the "Display on Video" box to visualize the defined area on the live video stream.
- Select the different Object Types (person, vehicle, animal, unknown) that you would like to detect within each defined area.
- Set the duration threshold for triggering events.
- Additional zones can be defined by clicking "+ Add". Draw a different polygon under "Area 2" if necessary.
Object Guarding
Detection of objects being removed from a specified area, indicating potential theft.
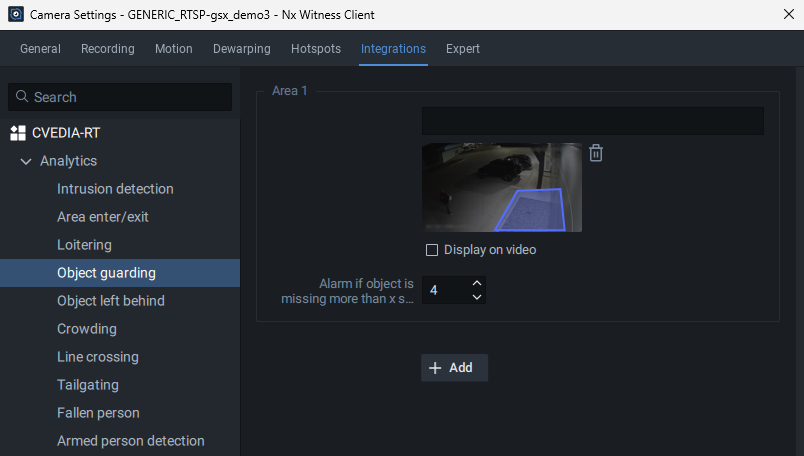
Configuration steps
- Navigate to Camera Settings > Plugins > CVEDIA-RT > Object guarding.
- Click directly on the image under "Area 1" to define the zone. Draw a custom polygon to encompass the area for object guarding.
- Tick the "Display on Video" box to visualize the defined area on the live video stream.
- Set the duration threshold for triggering events.
- Additional zones can be defined by clicking "+ Add". Draw a different polygon under "Area 2" if necessary.
Object Left Behind
Detection of objects being left in a specified area, indicating potential delivery or object abandonment.
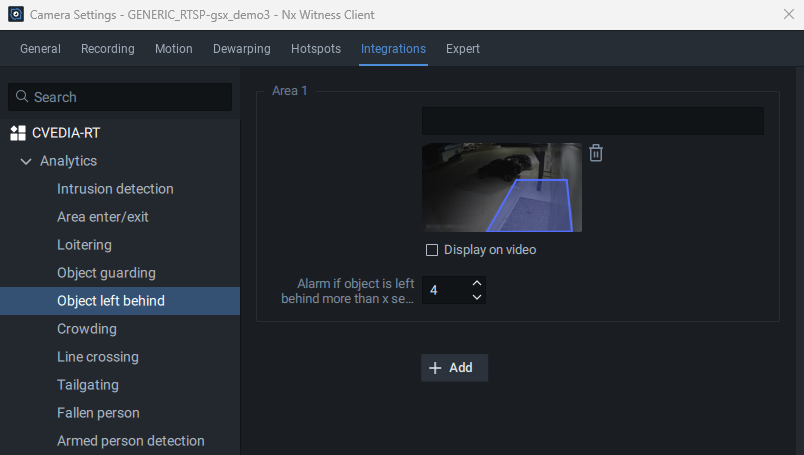
Configuration steps
- Navigate to Camera Settings > Plugins > CVEDIA-RT > Object left behind.
- Click directly on the image under "Area 1" to define the zone. Draw a custom polygon to encompass the area to detect objects left behind.
- Tick the "Display on Video" box to visualize the defined area on the live video stream.
- Set the duration threshold for triggering events.
- Additional zones can be defined by clicking "+ Add". Draw a different polygon under "Area 2" if necessary.
Crowding
Detects when the number of objects within a defined area at any given time reaches a set threshold. For instance, it could be a useful feature to detect a sudden increase of people in a queue in front of an ATM or in a commercial environment.

Configuration steps
- Navigate to Camera Settings > Plugins > CVEDIA-RT > Crowding.
- Click directly on the image under "Area 1" to define the zone. Draw a custom polygon to encompass the area for object detection.
- Tick the "Display on Video" box to visualize the defined area on the live video stream.
- Select the different Object Types (person, vehicle, animal, unknown) that you would like to detect within each defined area.
- Specify the minimum number of objects required to trigger an event.
- Additional zones can be defined by clicking "+ Add". Draw a different polygon under "Area 2" if necessary.
Tailgating
The tailgating feature detects if more than one object crosses a virtual line during a predefined time interval. This feature could be useful for detection of multiple individuals or vehicles following each other in close proximity to gain access to a secured area.
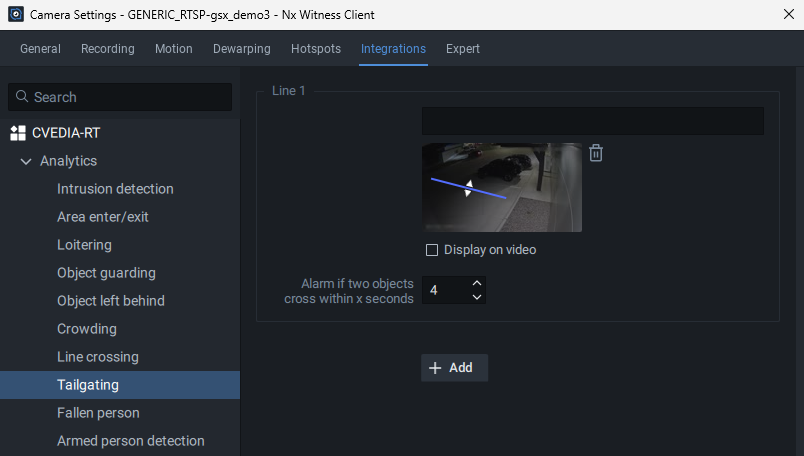
Configuration steps
- Navigate to Camera Settings > Plugins > CVEDIA-RT > Tailgating.
- Click directly on the image to create a virtual line.
- Click once to create new points of the line, then click on the last point to end it.
- Define the direction of movement for object tracking. Click on the Arrows to choose which direction you would like to use to trigger events.
- Tick the "Display on Video" box to visualize the configured virtual lines.
- Additional zones can be defined by clicking "+ Add". Draw a different polygon under "Area 2" if necessary.
Line Crossing
Detects objects that cross a defined line. Users have the option to create a multi-segment virtual line, and select the direction in which the movement of objects should be monitored.
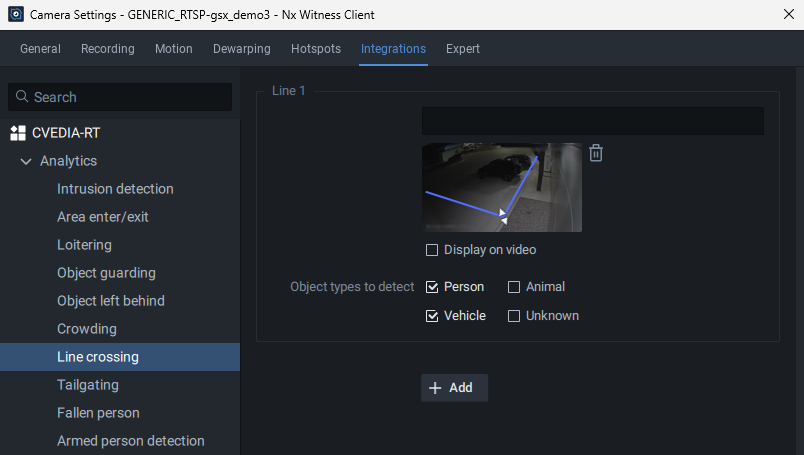
Configuration steps
- Navigate to Camera Settings > Plugins > CVEDIA-RT > Line Crossing.
- Click directly on the image to create a virtual line.
- Click once to create new points of the line, then click on the last point to end it.
- Define the direction of movement for object tracking. Click on the Arrows to choose which direction you would like to use to trigger events.
- Tick the "Display on Video" box to visualize the configured virtual lines.
- Additional zones can be defined by clicking "+ Add". Draw a different polygon under "Area 2" if necessary.
Forensic Search by Appearance
Appearance Search feature allows users to leverage Advanced Object Search within Nx Witness to identify objects matching search parameters based on clothing color and vehicle color. This feature simplifies the process of locating specific individuals or vehicles within extensive video archives.
To enable Appearance Search feature:
- Navigate to Camera Settings > Plugins > CVEDIA-RT.
- Enable Appearance Search feature by selecting one of the options from the dropdown menu: Person, Vehicle, or Person & Vehicle
- When a zone or a virtual line is configured for analytics, you will be able to monitor the detections in the "OBJECTS" tab. The color attribute will appear under the thumbnail image of the detected object.
- You can leverage Advanced Search functionality to filter out objects within existing detections based on vehicle and clothing color.
Excluded Areas
Excluded Areas feature allows users to define specific zones in the camera view where objects should not be detected. This is particularly useful for reducing false positives and enhance detection precision in the area of interest, especially when there is persistent movement in adjacent areas (e.g., a busy road near a sidewalk).
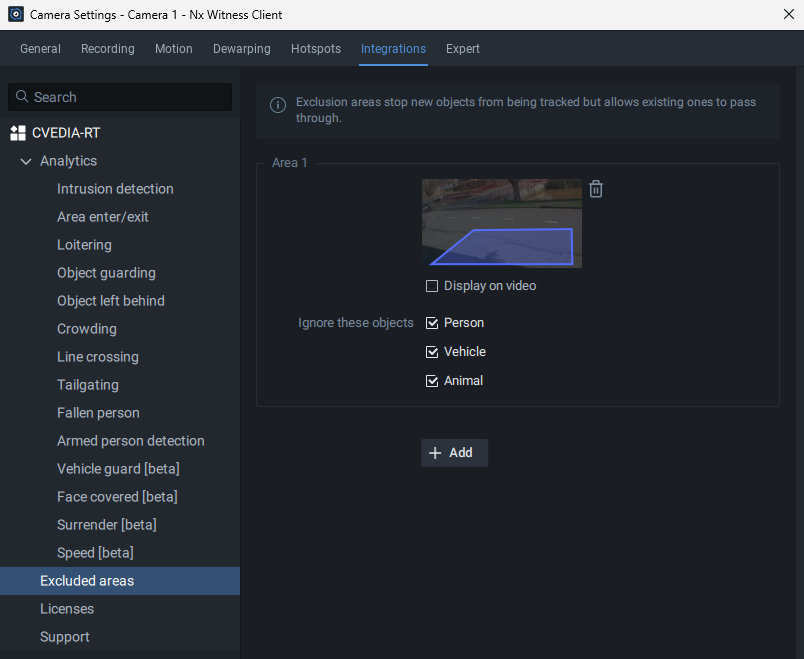
Configuration steps
- Navigate to Camera Settings > Plugins > CVEDIA-RT > Excluded Areas.
- Click directly on the image under "Area 1" to define the zone. Draw a custom polygon to encompass the area for object exclusion.
- Select the different Object Types (person, vehicle, animal, face) that you would like to exclude from detection.
- Additional zones can be defined by clicking "+ Add". Draw a different polygon under "Area 2" if necessary.
Note
Applying Excluded Area settings does not impact recordings on disk. This feature is not a replacement for privacy masks and should be used to focus detection on specific parts of the scene.
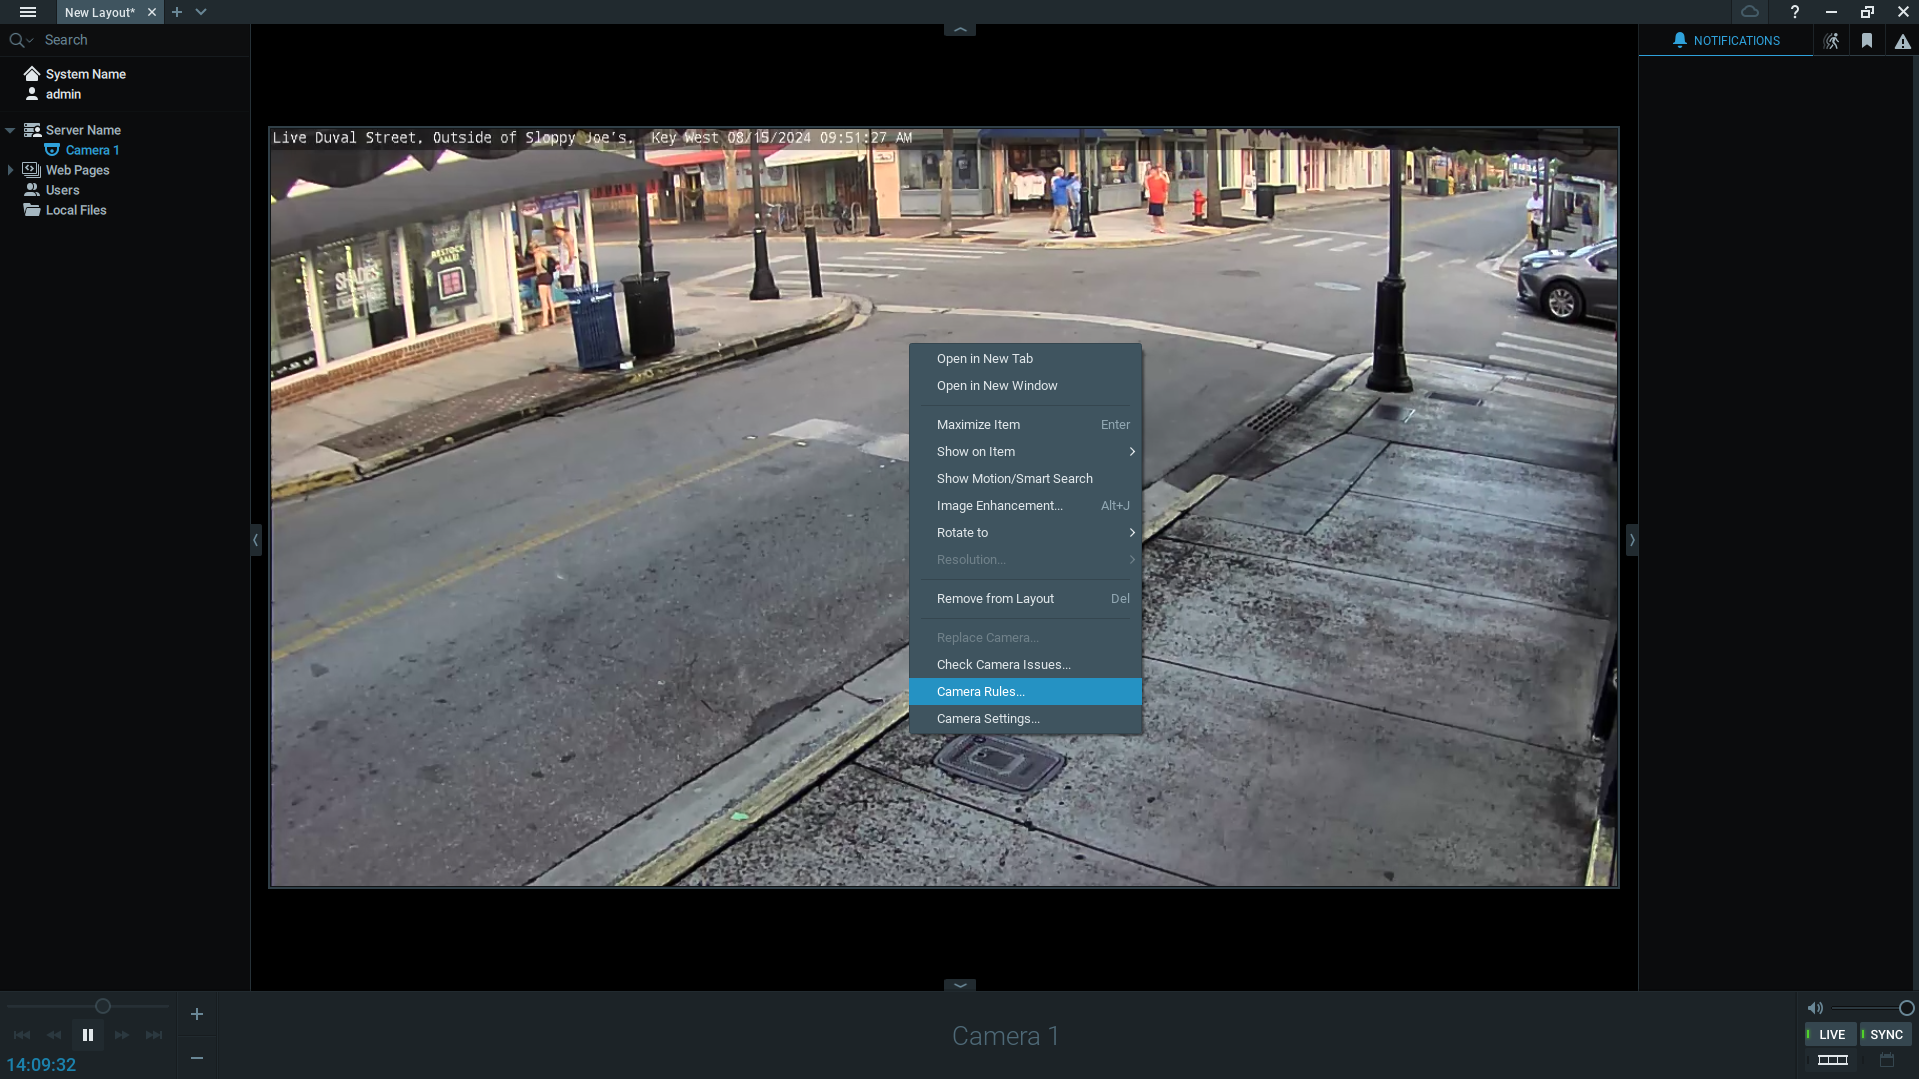
Creating Rules
- Right-click on an open video panel to see the menu options and navigate to camera rules.
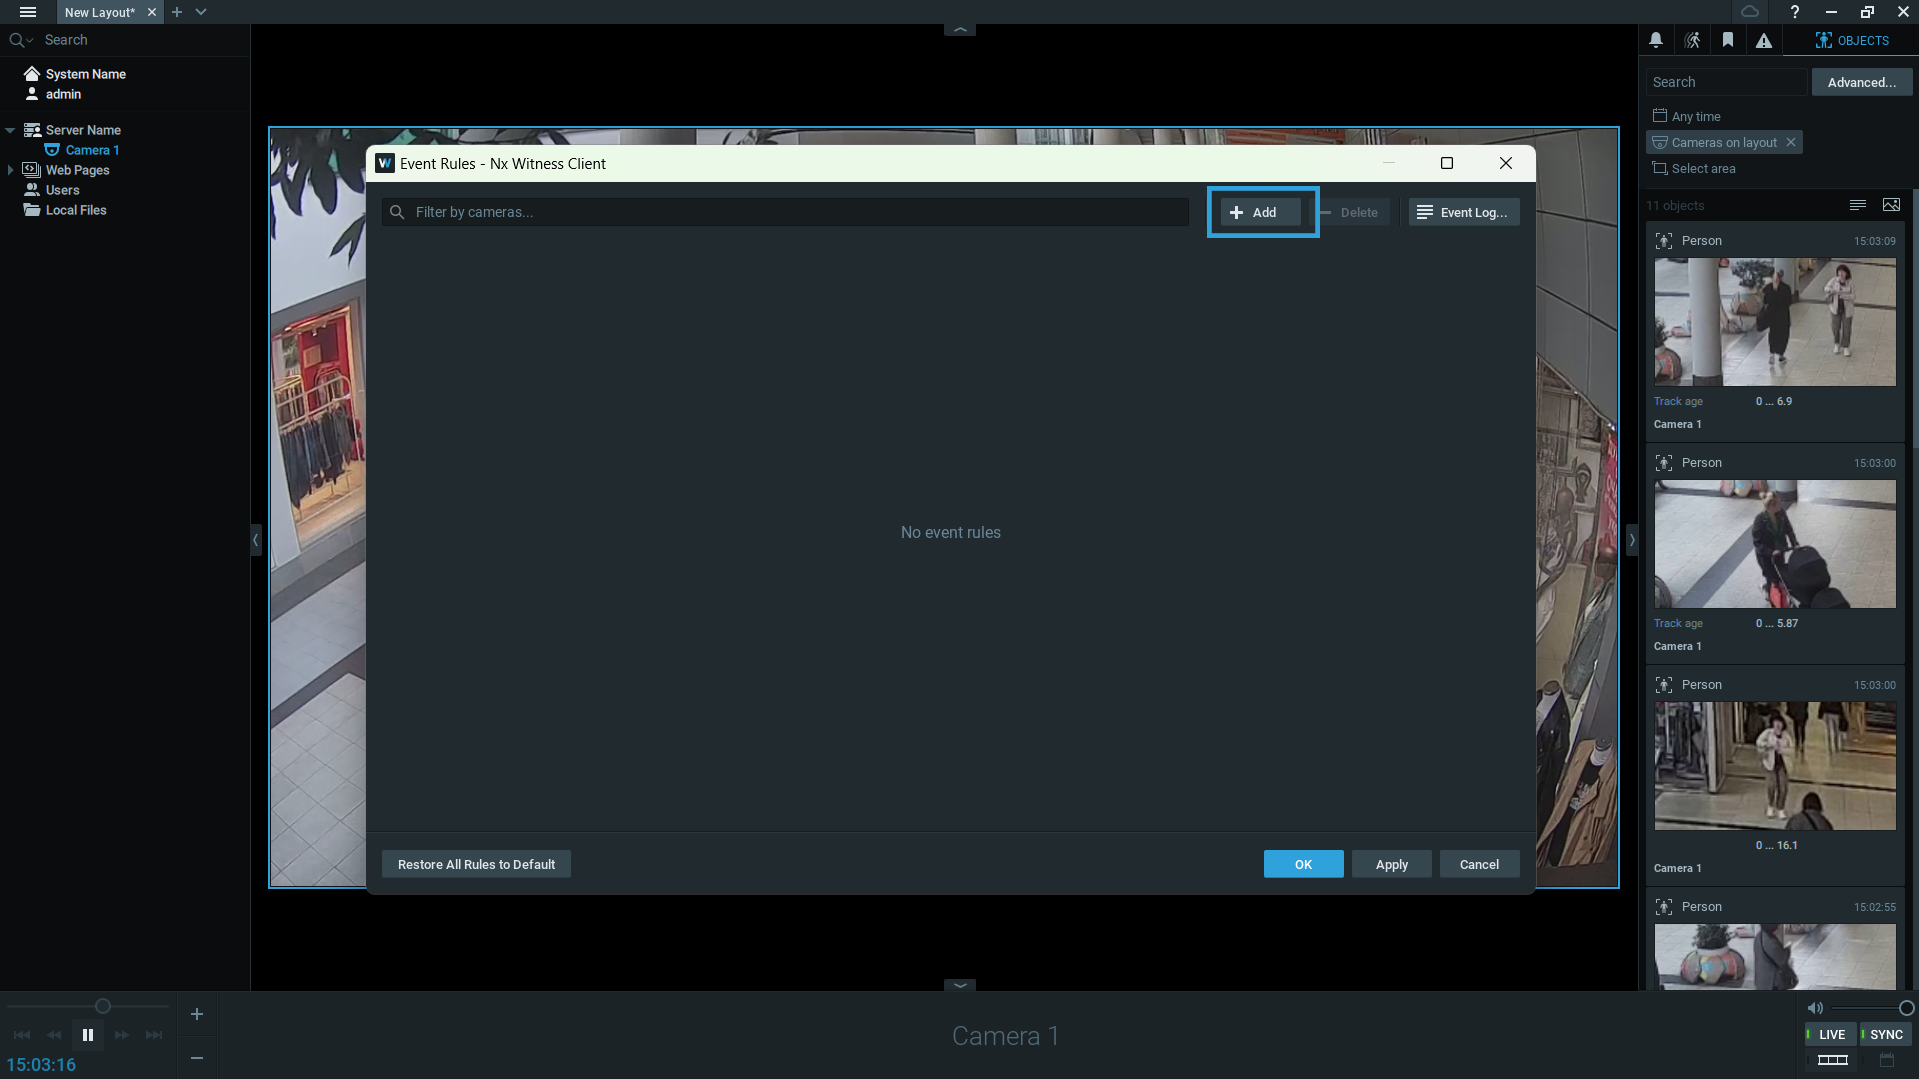
-
Click on the "+Add" button at the top right corner.
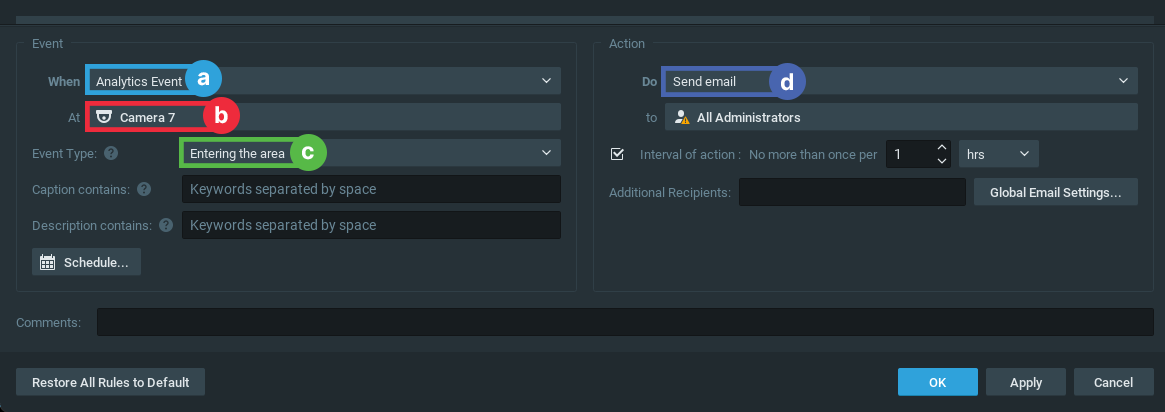
a When: choose "Analytics Event"
b At: select the relevant camera(s)
c Event Type: the event type to be triggered
d Do: specify actions such as desktop notification, email, sound, or bookmark creation. Bookmarks allow you to navigate the recording back in time to the exact moment when the event occurred (the video recording function should be enabled)
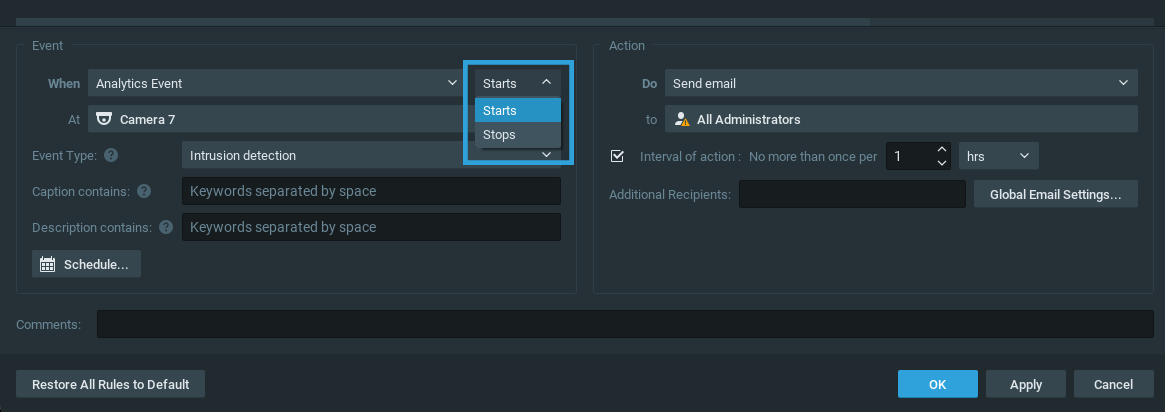
Info
For event types "Intrusion" and "Loitering", there will be an additional setting - "Starts or Stops" - so users can choose whether an event gets triggered when intrusion starts or stops.
Caption filter
The CVEDIA-RT AI Analytics plugin for Nx Witness supports captions in event rules configuration, allowing users to trigger actions based on specific zones or lines. By assigning names to areas or lines in the plugin settings, users can use the "Caption Contains" field to apply rules for specific detections in those locations.
This feature enables targeted actions, such as playing a sound or sending notifications, depending on where the event occurs. It also allows applying different schedules for different areas or lines, enhancing the flexibility and effectiveness of the surveillance system.
Expert Mode
Expert mode includes additional features for fine tuning the plugin performance.
To enable Expert mode:
- Navigate to System Administration -> Integrations/Plugins -> CVEDIA-RT
- Locate "Settings" block
- Tick the box next to "Enable expert mode"
- Navigate to Expert mode within Analytics settings in Camera Settings

AI Tracking Speed
The AI Tracking speed feature enables users to adjust the frame rate at which the AI processes data.
Modifying this from the default setting may impact server performance and reduce the number of AI streams that can run simultaneously on the same device.
Default: 5 FPS - Optimized for most of the security surveillance use cases.
Fast: 10 FPS - Optimized for tracking faster moving targets (e.g. cyclists).
Very Fast: 15 FPS - Optimized for capturing targets that move very fast (e.g. electric scooters).
Detection Sensitivity
Increasing detection sensitivity improves the ability to detect challenging targets (e.g., smaller, occluded, or affected by lens noise) but may lead to more False Positives. Change "Detection Sensitivity" settings to "High" if the system misses events involving small objects or in busy scenes.
Movement Sensitivity
Movement sensitivity controls how the system determines whether motion is occurring. Environmental factors such as rain, snow, camera noise, and light reflections, can cause false motion detection. Lowering motion sensitivity can minimize these false detections, but it increases the risk of missing fast-moving objects or objects visible for a very short time.
Override remote CVEDIA-RT address
By default, the plugin connects to the CVEDIA-RT server group specified in the camera settings. However, you can override this behavior by specifying a different server address. This is particularly useful for managing multiple cameras across different servers or when you want to centralize analytics processing on a specific server.