CVEDIA-RT Plugin for DW Spectrum - Setup Guide
This guide is designed for technical users responsible for installing, updating, and maintaining the CVEDIA-RT Plugin integration.
Architecture Overview
The CVEDIA-RT Plugin for NX-based VMS platforms can be deployed in two configurations:
All-in-One Deployment: The plugin and the CVEDIA-RT Server run directly on the same machine as the NX Media Server. This is the simplest setup and works well for small to medium deployments, provided the hardware meets the necessary requirements.
Distributed Deployment: The plugin on the NX Media Server connects to external CVEDIA-RT AI Appliances or RT Servers that handle AI inference. This allows scaling AI processing independently from the VMS infrastructure.
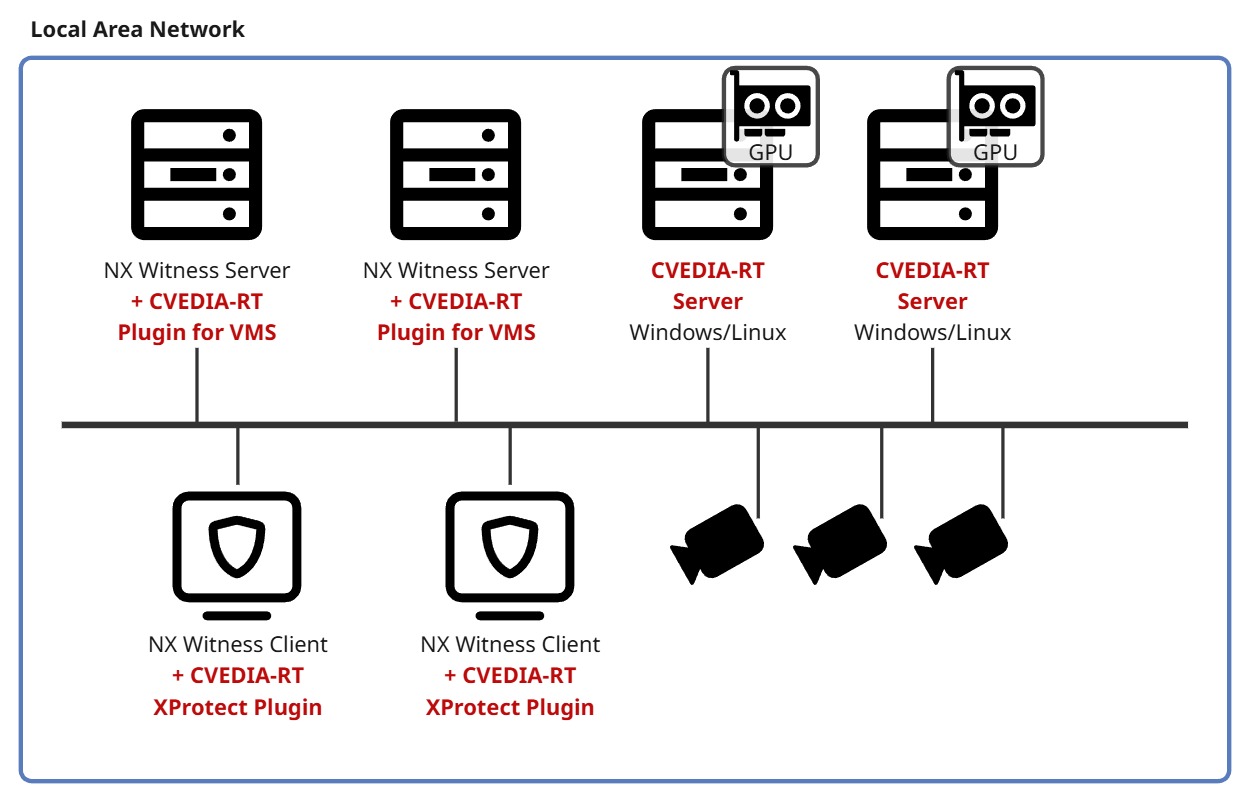
Failover Support
The distributed deployment architecture enables seamless integration with the native NX Witness failover mechanism. When the CVEDIA-RT Server runs on dedicated hardware separate from the NX Media Servers, cameras can be automatically transferred to a backup NX Witness Server during downtime without losing AI analytics capabilities. The backup server will connect to the same CVEDIA-RT Server or AI Appliance, ensuring continuous video analytics coverage during failover events.
Specifications and Requirements
CVEDIA-RT Server
- Appropriate CVEDIA licensing
VMS Requirements
- Nx Witness v6.x.x
Supported Decoders
- "video/h264" for H264 streams
- "video/hevc" for H265/HEVC streams
System Requirements
NX Plugin Requirements
The CVEDIA-RT plugin is a lightweight component that runs on the NX Media Server. It requires minimal resources:
- Disk Space: ~50 MB
- Windows: Windows 10 or newer
- Linux: Any Debian-based distro, Ubuntu 20 or newer
- No GPU or dedicated hardware required for the plugin itself
CVEDIA-RT Server Requirements
The RT Server performs AI inference and requires dedicated hardware resources. There are several deployment options:
- Windows 10 or newer
- GPU or VPU for decoding and AI inference
- 10 GB of disk space
For detailed installation instructions, see the Windows Installation Guide.
- Ubuntu 22 or 24 recommended
- 4 GB disk space
- GPU with CUDA support recommended (Compute Capability 7.5+ for x86)
For detailed installation instructions, see the Linux Installation Guide.
For production deployments, we recommend using the CVEDIA AI Appliance ISO image to set up dedicated RT Server hardware:
- Fully automated installation
- Built-in support for NVIDIA, Hailo, and Blaize accelerators
- Pre-configured for optimal performance
For detailed installation instructions, see the AI Appliance Installation Guide.
Connected Cameras
You need to have at least one camera added to the VMS to access the license management panel in the NX Witness Client UI.
Alternative License Activation
Licenses can also be activated directly on the CVEDIA-RT Server using the CLI or Web Panel, without requiring cameras in the VMS. See the License Management and RT Server documentation for more information.
Info
For more information on the camera setup in the VMS, please check the official manual: NX Witness User Manual
Installation
-
Download the CVEDIA-RT Plugin installer from https://rt.cvedia.com/NX-Witness
-
Stop Nx Witness Media Server.
-
Run the CVEDIA-RT Plugin installer on the machine where the Nx Witness Media Server is installed
-
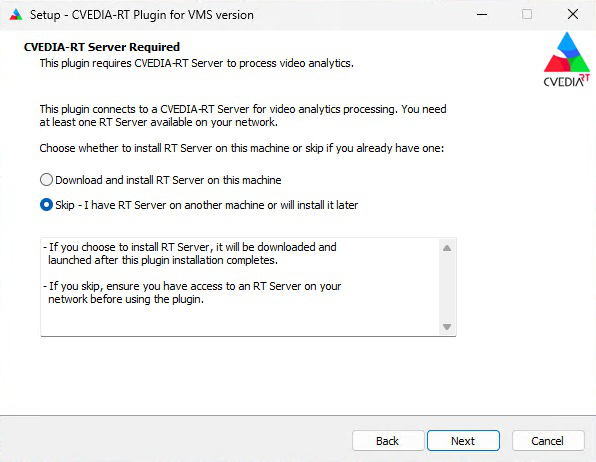
You will offered the possibility to install the RT-Server locally as well for All-in-One deployments. Skip this step if you plan to use an external RT-Server or AI Appliance.
-
After the installation is complete, start the Nx Witness Server. This action is necessary for the plugin to appear in the Camera Settings menu.
Command Line Installation
If you need to run the installer without user interaction (for example for automating the setup of new devices), you can use the command line from the Windows Terminal.
Using start /wait
Always use start /wait "" before the installer command to ensure the command prompt waits for the installation to complete before continuing. This is important due to UAC elevation.
Plugin Only (Thin Client)
To install only the plugin without the RT Server (for distributed deployments):
start /wait "" "CVEDIA-RT-VMS-Plugin-Thin-Client-Setup-2026.1.0.exe" /VERYSILENT
Plugin with RT Server (All-in-One)
To install the plugin and automatically download and install the RT Server:
start /wait "" "CVEDIA-RT-VMS-Plugin-Thin-Client-Setup-2026.1.0.exe" /VERYSILENT /RTSERVER=install /IPBINDING=0.0.0.0
Plugin with RT Server (No Trial Activation)
To install the plugin and RT Server without activating the trial license:
start /wait "" "CVEDIA-RT-VMS-Plugin-Thin-Client-Setup-2026.1.0.exe" /VERYSILENT /RTSERVER=install /IPBINDING=0.0.0.0 /TRIAL=false
Specifying VMS Platform
If multiple NX-based VMS platforms are installed on the same machine, use the /VMS parameter:
start /wait "" "CVEDIA-RT-VMS-Plugin-Thin-Client-Setup-2026.1.0.exe" /VERYSILENT /VMS=NxWitness
Command Line Options
| Parameter | Values | Default | Description |
|---|---|---|---|
/SILENT |
- | - | Show progress UI but proceed automatically |
/VERYSILENT |
- | - | Hide UI completely |
/RTSERVER |
skip, install |
skip |
Download and install RT Server |
/IPBINDING |
IP address | 127.0.0.1 |
IP binding for RT Server (if installing) |
/VMS |
VMS ID | auto-detect | Target VMS when multiple are installed |
/TRIAL |
true, false |
true |
Activate trial license after RT Server installation. Use /TRIAL=false to skip trial activation |
/LOG |
filename | - | Create installation log file |
Supported VMS IDs for /VMS parameter:
| VMS ID | Platform |
|---|---|
NxWitness |
Nx Witness |
NxMeta |
Nx Meta |
Watchdog |
DW Spectrum |
Hanwha |
Wisenet WAVE |
Piko |
Piko |
AlphaVS |
Alpha VS |
IP Binding Options
The /IPBINDING parameter controls which network interfaces the RT Server listens on:
127.0.0.1- Local connections only (default)0.0.0.0- All network interfaces (required for distributed deployments)- Specific IP - Bind to a specific network interface
Please check the linux installation guide.
Before Installation:
- Ensure NX Witness Server is Installed on the same device where the plugin will be installed.
-
If
curlis not installed, install it with:sudo apt install curl
Installation:
Run the VMS plugin installation script:
curl -sqko - http://get.cvedia.com/vms-plugin | sudo bash
This will install only the plugin without the RT Server. See the requirements for deploying the RT Server on separate hardware.
Run the VMS Plugin installer with a flag to install the RT Server as well:
curl -fsSLo - http://get.cvedia.com/vms-plugin | sudo RTSERVER=1 bash
Environment Variables
The installation scripts support the following environment variables:
| Variable | Description |
|---|---|
CVEDIA_WEB_SERVER_IP |
Override the RT Server binding IP (default: 127.0.0.1)• Set to 0.0.0.0 to bind to all network interfaces• Only applicable for All-in-One deployments • Required when RT Server REST API access is needed from external devices |
CVEDIA_ACCEPT_EULA |
Set to 1 to automatically accept CVEDIA's EULA |
Example with environment variables:
curl -sqko - http://get.cvedia.com/vms-plugin | sudo RTSERVER=1 CVEDIA_WEB_SERVER_IP=0.0.0.0 CVEDIA_ACCEPT_EULA=1 bash
Verify Installation:
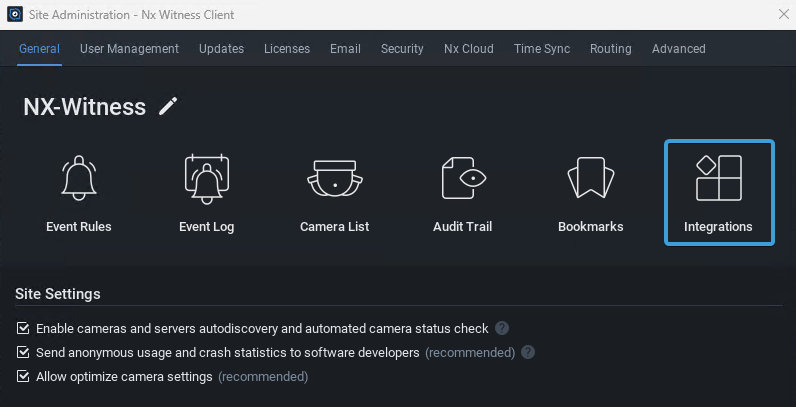
- Open the Nx Witness Client
- Open the System Administration settings from the hamburger icon in the top left corner (or by pressing Ctrl+Alt+A)
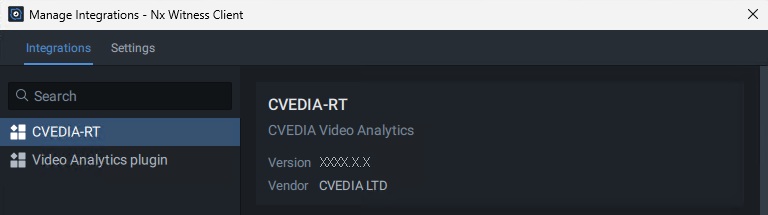
- Select the "Integrations" tile or the Plugins tab (for versions prior to 6.1)
- Confirm that the CVEDIA-RT plugin is listed on the left menu and that the version is correct.
Please check the full linux installation guide for docker.
Running VMS within docker
./run.sh --nxw
This will run the NX Witness server.
Different NX Flavors
CVEDIA-RT supports the following NX flavors:
- Nx Witness (default):
--nxw - Nx Meta:
--mtv - Wisenet WAVE:
--hwv - DW Spectrum:
--dwg - Piko:
--pik
Please check ./run.sh --help for additional information.
Warning
Running VMS within docker is intended for debugging / demo purposes, you won't be able to upgrade the VMS install in a easy way and it's license keys will be bound to the docker container itself.
Verify the Installation
- Open the Nx Witness Client
- Open the System Administration settings from the hamburger icon in the top left corner (or by pressing Ctrl+Alt+A)
- Select the "Integrations" tile or the Plugins tab (for version prior to 6.1)
- Confirm that the CVEDIA-RT plugin is listed on the left menu and that the version is correct.
Plugin Activation
To activate the analytics on one of the connected cameras, follow these steps:
- Open the Nx Witness Client and connect to the server where you installed the plugin.
-
Right-click on a connected camera or a video stream and select "Camera Settings."
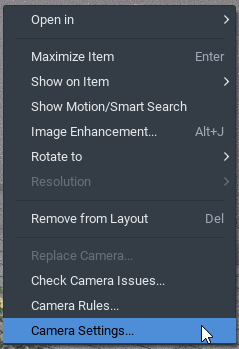
-
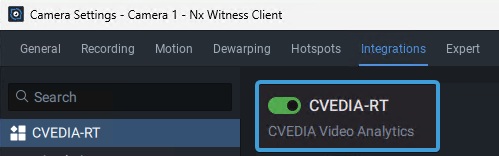
Navigate to the Integrations/Plugins section of the Camera Settings window, select and enable the plugin.
Important
Click the "Apply" button before proceeding with any further configuration.
Notes
- If you don't see the toggle to enable the plugin right away, please click on CVEDIA-RT title on the left sidebar first.
- This operation will increase the number of active AI channels. Please make sure your plugin license key covers the number of channels you wish to activate.
- If the plugin is disabled, the stream is ignored and not counted toward the limits of the license.
- Analytics work only when the camera is being viewed or recording is enabled.
License Management
To manage the plugin license using the user interface of Nx Witness, you need at least one camera added to the VMS.
Info
Even though the license is managed under the settings of a camera, the license is applied to the selected CVEDIA-RT Server, and it will be available for all cameras connected to the server.
-
Navigate to Camera Settings and open the Integrations/Plugins tab.
-
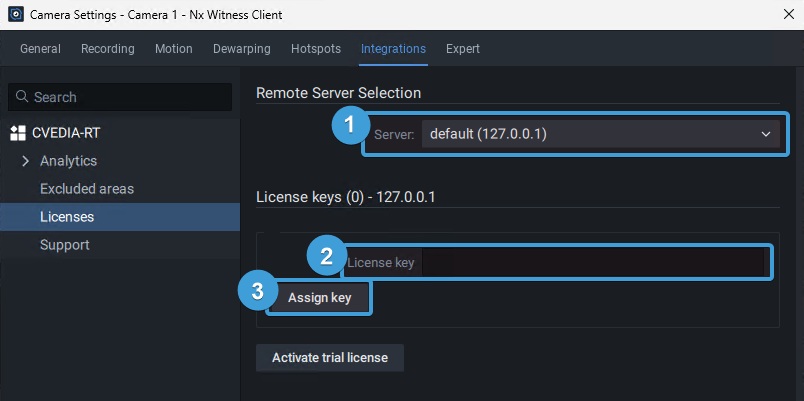
Select Licenses on the left side menu panel.
-
Select the CVEDIA-RT Server from the dropdown menu.
-
If you didn't activate a trial license during installation of the CVEDIA-RT Server, you can now activate a trial license by clicking the "Activate Trial License" button.
Notes
- A trial license provides access to all features included in the CVEDIA-RT Plugin for up to 4 video channels for a 30-day evaluation period.
-
To apply a purchased key, enter it in the designated field and click on the "Assign Key" button. Then click the OK or Apply button before closing the window.
Notes
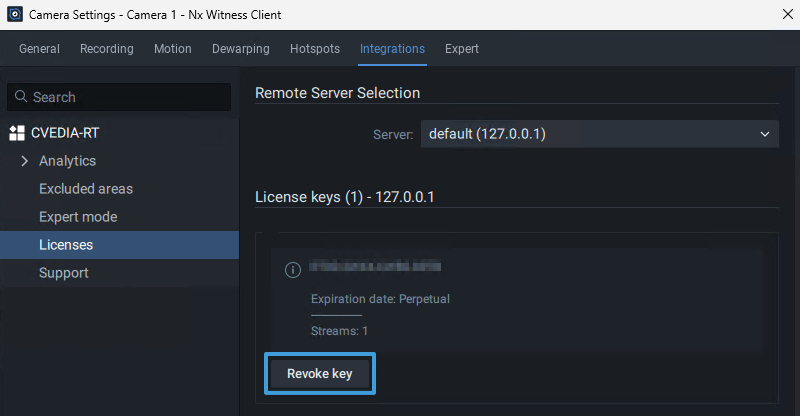
- Once activated, the license is bound to the device (the selected CVEDIA-RT Server).
- The number of streams indicates a maximum number of concurrent cameras running analytics. To increase this limit, obtain a new license with additional streams and activate it. Multiple license keys can be activated on the same device.
- To use the same license key on a different device, deactivate it by clicking the "Revoke Key" button.
License Status Panel
You can check the licensing status in the main screen of the plugin in the Camera Settings.
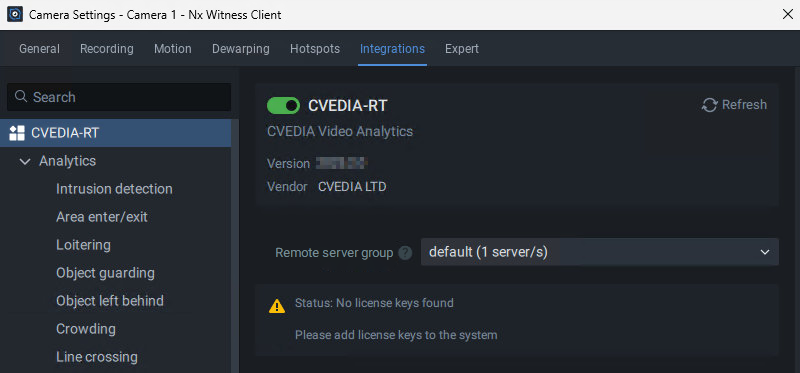
- No License Found - The panel shows Status: No license keys found, indicating that no valid license has been added to the system. As a result, Analytics can still be configured but remain inactive until a valid license is added.
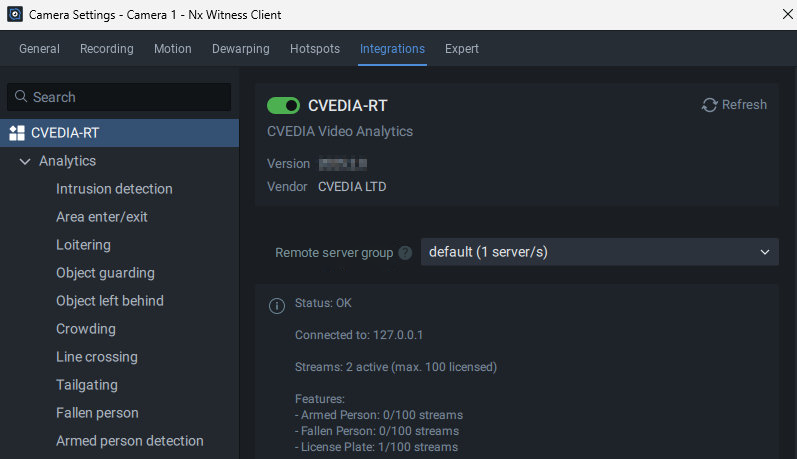
- License Active and Within Limits - The panel shows Status: OK, confirming that the configured Analytics are within the existing license limits.
- License Exceeded - The panel shows Status: Too many streams, indicating that the number of configured Analytics has exceeded the maximum allowed by the license(s).

CVEDIA-RT Server Connection, Naming and Scalability
When the analytics are enabled for a camera, the plugin uses the selected group to route the inference requests to the appropriate CVEDIA-RT Server.
Each CVEDIA-RT Server is assigned the default name.
The CVEDIA-RT Server name is used as a group identifier, and multiple servers can be deployed under the same name to create a scalable cluster of inference devices.
If you have multiple CVEDIA-RT Servers with different names, they will be listed separately in different groups. This is particularly useful in cases where different license types or performance levels are required for various tasks.
The plugin will automatically discover all CVEDIA-RT Servers with the same name on the network and distribute the inference workload across them. This allows for load balancing and failover support, ensuring high availability and optimal performance.
IP Override
There could be scenarios where you may want to bypass the server name resolution and directly assign the inference for a camera stream to a specific server. This is where the IP override feature comes into play.
This feature may be useful when the CVEDIA-RT Server is not discoverable in the local network, or when you want to ensure that a specific server is used for inference regardless of the server's group.
To configure an IP override you first need to enable Expert Mode in the plugin admin settings, then navigate to the Expert tab in the Camera Settings.
For more information on enabling Expert Mode, please refer to the System Administration section.

Analytics Status Identifier
Once Analytics is configured, the Analytics Status Indicator will display whether it was set up successfully [+] or otherwise [x]. If Analytics is not configured, no status will be shown.
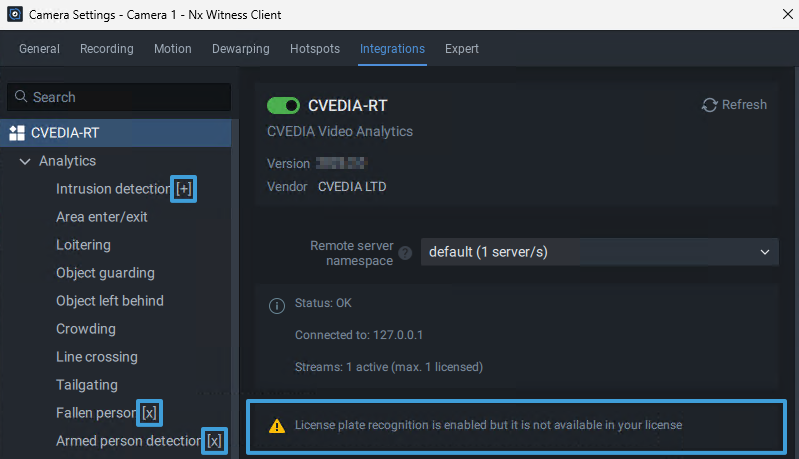
For the License Plate Recognition (ALPR) analytics, a warning will appear if the license does not include ALPR support.
System Administration
The plugin includes system-wide settings that apply to all cameras connected to the server. Please note that some settings will only take effect after restarting the media server.
To navigate to System Administration:
- Click on the "hamburger icon" in the top left corner of the Nx Witness Client and select "System Administration..." or press the Ctrl+Alt+A key combination.
- Select the "Integrations" tile or navigate to the "Plugins" tab (for NX Witness versions prior to 6.1) and click on the plugin name on the left menu panel.

Operating Mode
Important
Changing any operating mode settings requires restarting the media server
Profile Selection
The Profile setting allows users to adjust the AI processing mode to best match the camera environment and available system resources. Selecting the right profile helps balance detection accuracy with computational efficiency.
Hi-res Profile
- Default and recommended setting.
- Runs a larger, heavier AI model for higher detection accuracy in crowded environments or on distant targets.
- Uses the primary camera stream.
Standard Profile
- Runs a smaller, lighter AI model, lowering the processing load on systems with limited resources.
- Uses the secondary camera stream.
- Offers a balanced approach to system performance and detection precision.
Automatic Stream Selection
When enabled, Automatic Stream Selection configures the streams as follows:
- Standard mode: Uses the secondary stream.
- Hi-res mode: Uses the primary stream.
When disabled, you can override the stream selection for running analytics. Disabling this feature allows you to select either the Primary or Secondary stream for running analytics on each camera, by configuring the stream
To navigate to the Camera Stream settings:
- Right-click on the video stream and select "Camera Settings."
- Click on the "Plugins" tab and select CVEDIA-RT on the left menu panel.
Notes
The "Camera Stream" selection becomes available only when the "Automatic Stream Selection" is disabled in the Plugin tab of the System Administration settings.
Important
Starting from version 6 of the Media Server, if you plan to activate the plugin on an RTSP stream or ONVIF cameras without the secondary stream, you must disable the Automatic Stream Selection, or use the Hi-res profile (that by default uses the primary stream). Applying these changes requires restarting the Media Server.
Settings
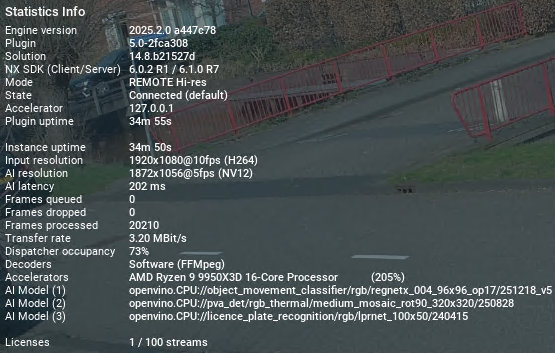
Overlay Statistics
The Statistics panel can be useful for debugging, providing insights into system health and hardware utilization.
Important
Don't keep the statistics panel open. When the panel is visualized, it could prevent the Media Server from recording correctly.
In order to visualize the statistics panel, tick the "Overlay statistics" box in the System Administration Settings. Click "OK" to save the settings, and go to the "OBJECTS" tab. You may need to wait a few seconds for the panel to appear.
Enable Expert Mode
Reveals the Expert Mode menu in the left panel of the Analytics settings in the Camera Settings for advanced configuration.
Updating the Plugin
- Check for new plugin versions on the official website: https://rt.cvedia.com/NX-Witness
- Download the new version.
- Stop the Nx Witness Server and run the installer.
- For an All-in-One deployment, select to update the RT Server as well.
- Start the Nx Witness Server once the installation is complete.
- All configured settings and applied licenses will be preserved.
- Check for new plugin versions and release notes on the official website: https://rt.cvedia.com/NX-Witness
- Follow the same installation instructions as above to run the installation script again.
- The script will automatically detect and update to the new version.
- All configured settings and applied licenses will be preserved.
Uninstalling the Plugin
Important
It is recommended to revoke the license key prior to uninstalling the plugin from your system. This way, if the license key is still active and hasn't expired, it can be re-used on a different device.
- Open Settings: press Windows key + I or click the Start menu, then select Settings.
- Go to Apps: click on Installed Apps and find CVEDIA-RT Plugin for VMS in the list.
- Uninstall the Plugin: select CVEDIA-RT Plugin for VMS and click Uninstall. Confirm if prompted.
- If you installed the RT Server as well and want to remove it, repeat the process for CVEDIA-RT Server.
- If prompted, restart your computer to complete the process.
- Open Terminal: Press Ctrl + Alt + T or search for Terminal in your applications menu.
-
In the terminal, type the following command and press Enter:
sudo apt remove cvedia-rt-nxplugin-thin -yif you installed the RT Server as well and want to remove it, run:
sudo apt remove cvedia-rt -y -
If prompted, enter your administrator password and press Enter.
- The system will automatically remove the plugin. Once done, close the terminal.
Technical Support
For comprehensive technical support information, including troubleshooting guides, log file locations, and reporting procedures, please refer to our Technical Support Documentation.
Key support resources:
- System troubleshooting guides
- Log file collection procedures
- Hardware diagnostics
- Performance optimization
- Bug reporting workflows
For immediate assistance, you can also submit a support request through the CVEDIA Tech Support Portal.