Input
The input module is a container that allows other modules to register their protocol handlers. By providing a unified interface it simplifies working with different video or image sources
Example usage
instance = api.thread.getCurrentInstance()

--- Load module
input = api.factory.input.create(instance, "Input")

--- Load specific resource
input:setSource(conf.uri)

--- Read frame
while (input:readFrame()) do
end
The Input module is a container and does not have a Core implementation. See the handler modules below for their Core examples.
#include "RTCORE/include/builtin/inputmanaged.h"

#include "RTCORE/include/API/server.h"
#include "RTCORE/include/API/RTAPI.h"

using namespace cvediart;
using namespace cvediart::api;
using namespace cvediart::plugin::io;

void example() {
    // Discover modules on disk
    Server::registerPlugins();

    // Create demo instance
    Server::createInstance("test");

    // Retrieve RTAPI instance
    auto rtapi = Server::getInstanceByName("test");

    // Load module
    auto inputPlugin = std::reinterpret_pointer_cast<InputManaged>(rtapi->loadPlugin("Input", "MyPlugin", ""));

    // Set active URI
    inputPlugin->setSource("ffmpeg:///./assets/tests/videos/vtest.avi");

    // Start reading
    while (inputPlugin->readFrame()) {
        // Other logic
    }
}
In the Managed/Lua interface the actual data being read is never passed back to the caller but instead placed in the running instance's framebuffer where other modules have access to it.
URI format
All resources are specified using a URI scheme and follow the same format:
scheme:[//authority]path[?query][#fragment]
The currently supported schemes are:
file: msmf: ffmpeg: rtsp: screencap: camera:
The implementations are provided by two modules:
VideoReader and Screencap
Handlers
VideoReader
Handler that provides an interface to OpenCV and FFMPEG for video/image reading. This module can only be accessed through the Input module or directly as a Core interface.
Usage
Example usage
#include "Plugins/VideoReader/include/videoreader.h"

cvediart::plugin::videoreader::VideoReader reader;

reader.openUri("file:///./assets/tests/videos/vtest.avi");

cv::Mat img;

do {
    img = reader.getNextFrame();
} while (!img.empty());

reader.close();
Configuration
Config examples
"<instance name>": {
  "config": {
   "VideoReader": {
    "repeat_mode": 0,
    "end_frame": 0.0,
    "real_time": false,
    "start_frame": 0.0
   },
   "uri": "file:///assets/videos/CA-Encinitas-Rte101Leucadia-WC-20170701-1100/"
  }
 }
}
---@param plugin inputApi
function Input.onInit(plugin)
    local conf = plugin:getConfig()

    conf.VideoReader.real_time = false
    conf.VideoReader.start_frame = 0
    conf.VideoReader.end_frame = 100
end
void example() {
    cvediart::plugin::videoreader::VideoReader reader;

    reader.pluginConf.real_time = false;
    reader.pluginConf.start_frame = 0;
    reader.pluginConf.end_frame = 100;
}
Setting playback output FPS
It's possible to manually set the desired output fps for an instance, simulating another input source. For this, the parameter real_time must be set to false and sampling_rate must be set to a value different than 0. Example, setting desired output fps to 1:
"Input": {
     "config": {
      "VideoReader": {
       "repeat_mode": 0,
       "sampling_rate": 1.0,
       "real_time": false,
       "start_frame": 0.0,
       "end_frame": 0.0
      }
    }
}
Setting Repeat mode
It's possible to manually set the repeat mode for the instance by defining the "repeat_mode" property on the input configuration.
For this, the parameter repeat_mode must be set to one of the following values:
Repeat mode options
- RepeatMode_ALL = 0
- RepeatMode_VIDEO = 1
- RepeatMode_NONE = 2
Schemas
File
Used for loading images or directories of images from a local path. Loading is performed internally by OpenCV's imread() and the supported fileformats will depend on how OpenCV was compiled.
Example URI's:
# Notice the triple slash due to the empty 'authority'

# Folder
file:///C:/projects/demo/myimages/

# Specific image
file:///./projects/demo/test.jpg
FFMPEG
Provides an extensive range of supported video formats that depend on compile time configuration. This is the recommended way for loading videos in RT as its supported across a wide array of devices and platforms.
Most commonly playback of the following formats will be supported:
.mp4, .mpg, .avi, .mkv, .mov
Example URI's:
# Notice the triple slash due to the empty 'authority'

ffmpeg:///C:/projects/demo/myvideo.mp4
ffmpeg:///C:/projects/demo/myvideo.avi
MSMF
Which stands for Microsoft Multimedia Framework and provides video playback capabilities on windows systems. Its usage is similar to that of the FFMPEG backend but differences exist in available codecs. For cross-platform compatibility its usage should be limited but in some conditions it will allow playback of media on which FFMPEG fails.
Example URI's:
# Notice the triple slash due to the empty 'authority'

msmf:///C:/projects/demo/myvideo.mp4
RTSP
Playback of streaming video from a camera source. The internal playback is provided by FFMPEG but comes with its own URI scheme in RT.
Since online sources can be inherently unstable, the RTSP module will handle reconnection automatically after interruptions.
Example URI's:
rtsp://demo:[email protected]:5541/onvif-media/media.amp?profile=profile_1_h264&sessiontimeout=60&streamtype=unicast
Camera
Enables the playback of locally connected cameras through the OpenCV API. Devices are specified by their ordinal number as they are registered on the system.
Example URI's:
camera:///1
camera:///2
Screencap Plugin
Only available on Windows, Screencap provides the ability to capture any screen or window as a video source for RT. Mostly used for demo or testing purposes it allows for highly interactive experiences with a given configuration.
Configuration
Config examples
"<instance name>": {
 "config": {
  "Screencap": {
   "capture_cursor": false
  },
  "uri": "screencap:///"
 }
}
---@param plugin inputApi
function Input.onInit(plugin)
    local conf = plugin:getConfig()

    conf.Screencap.capture_cursor = false
end
void example() {
    cvediart::plugin::screencap::Screencap cap;

    cap.capture_cursor = false;
}
Scheme
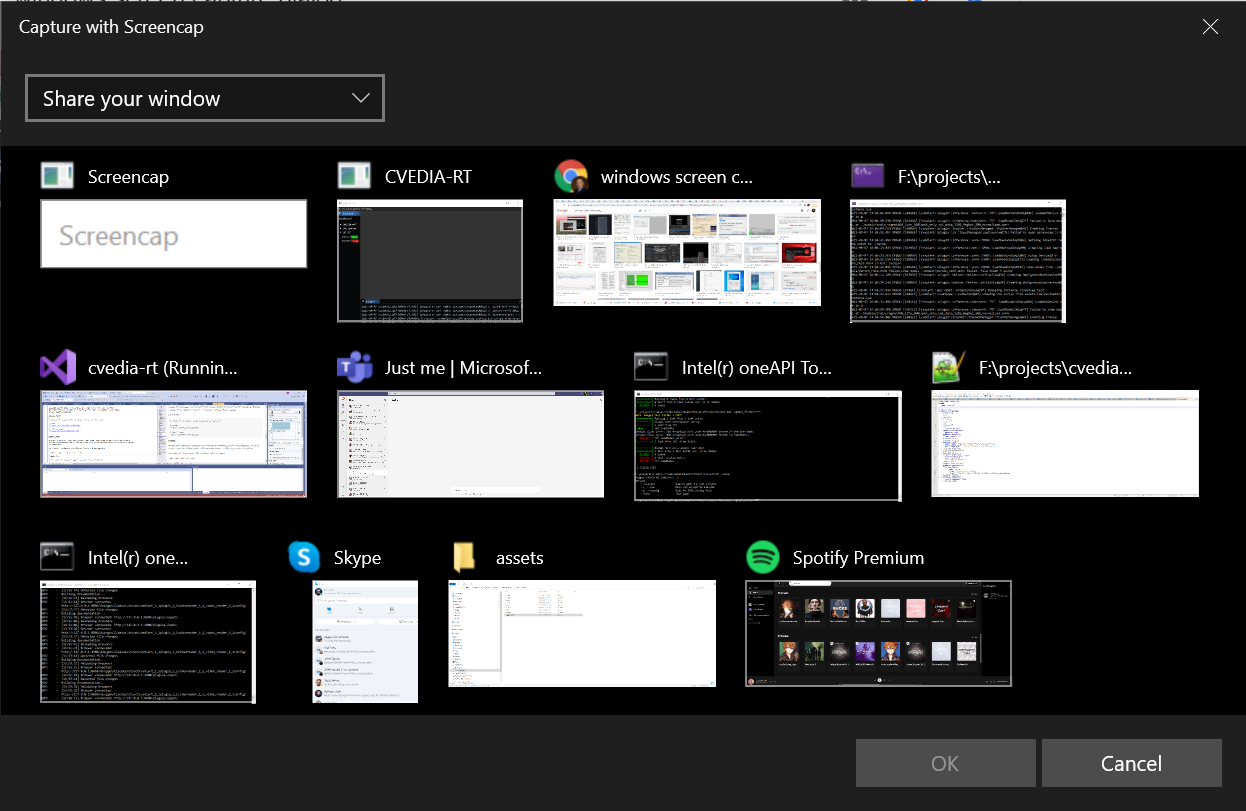
Accessing it's URI will automatically trigger a screen selection dialog that allows the user to pick the data source. No specific paths or arguments are required.
Example URI:
screencap:///
Motion Stabilization
In situations where motion is used as part of the tracker/classifier pipeline it can be beneficial to stabilize the
camera movement due to wind and vibrations. Higher values of sliding_window_radius will reduce movement more effectively
but at the expense of processing power and startup delays.
Configuration
JSON
"<instance name>": {
 "config": {
  "model": "homography",
  "sliding_window_radius": 52.0,
  "stabilize_motion": true,
  "trim_ratio": 0.0,
  "uri": "<uri>"
 }
}