CVEDIA-RT Plugin for Milestone XProtect - Configuration Guide
This guide is designed for users responsible for configuring analytics settings, managing detection parameters, and setting up rules and alerts within the CVEDIA-RT plugin for Milestone XProtect.
Key Features
Standard Security Features
Detects people, vehicles, and animals within a variety of surveillance use cases.
- Intrusion detection
- Area enter/exit
- Loitering
- Object guarding
- Object left behind
- Crowding
- Tailgating
- Line crossing
Enhanced Appearance Search
Advanced object classification is available for retrospective search and metadata filtering:
- Vehicle: Door open, Lights On, License Plate (searchable), Color, Type
- People: Gender, Wearing Glasses, Age, Using phone, Carrying bag, Smoking, Face covered, Requires assistance, Upper clothing color, Lower clothing color, Has Tattoo, Surrender pose
- Animal: Species (bear, elephant, wolf, cat, dog, bird, deer)
Premium Features
Specialized analytics that provide enhanced situation context and assist in identifying high-priority events.
- Armed Person Intrusion
- Fallen Person Detection (Slip & Fall)
- ALPR (Automatic License Plate Recognition)
Analytics Configuration
Once the initial setup is done, you can use the CVEDIA solution directly in XProtect Smart Client.
CVEDIA-RT analytics are available in all streams in your current view, and you can access the configuration menu by pressing the CVEDIA logo in the top right corner.

A new window will open, allowing you to configure analytics for the selected view. Detailed explanations of the available options and their functionalities are provided in the sections below.
Enable the Analytics on the camera to connect to a CVEDIA-RT Server and click "OK". Then open the CVEDIA panel again to check the license status.

Known Issue
The error message "Cannot show bounding boxes. Check if computer time is correct" is a misleading message generated by the system, no action is necessary. Bounding boxes will be displayed correctly once the analytics are configured.
Different types of analytics allow you to configure one or more detection areas or lines, choose the types of objects to detect, and select additional related parameters.
Notes
- Analytics are active only if at least one area or one line is defined, or when License Plate Recognition or Enhanced Search features are enabled.
- Please note that you can enable multiple area or line based analytics at the same time. This will not impact the performance of the system.
- Analytic events will be produced whenever a specified object class interacts with the configured zones and lines, or a license plate is detected in the camera's field of view.
Enhanced Search
Enhanced Search feature allows users to leverage Smart Object Search within XProtect Smart Client to identify objects matching search parameters based on collected attributes. This feature simplifies the process of locating specific individuals or vehicles within extensive video archives.
For more information on how to use Enhanced Search, please refer to the Forensic Search by Appearance section.

Zone and Line Drawing Tool
To define a zone of interest and configure the analytics, click on the stream's captured image to activate the zone drawing tool.

Creating Zones (Polygons)
Click on the image to place points to outline the shape of the polygon. To complete the polygon, click on the starting point.
Use the full screen button to quickly create a full screen zone that covers the entire video frame.

Creating Virtual Lines
Click on the image to create points of the virtual line. To finalize the virtual line, click on the last point.

Editing Zones and Virtual Lines
After completing a zone or a line, you can move the entire shape or adjust individual points; add new points by clicking the middle markers on segment lines; remove points by right-clicking on them.
Intrusion Detection
Detects objects that move inside a defined intrusion area. The event is triggered for any new target object (person, vehicle, animal) entering the area.

Configuration steps
- Open XProtect Smart Client.
- Click on the CVEDIA logo at the top right corner of a video stream.
- Click directly on the image under "New Trigger" to define the intrusion detection zone. Draw a custom polygon to encompass the area for intrusion detection.
- In the "Name" field, you can give a custom name to the zone of interest.
- Tick the "Display on Video" box to visualize the defined area on the live video stream.
- Select the different Object Types (person, vehicle, animal, unknown) that you would like to detect within each defined area.
- Additional zones can be defined by clicking "+ Add".
Area Enter/Exit
Detects objects that enter/exit a defined area. This analytic can be employed to monitor objects detected in the area without triggering an intrusion event.

Configuration steps
- Open XProtect Smart Client.
- Click on the CVEDIA logo at the top right corner of a video stream.
- Click directly on the image under "New Trigger" to define the detection zone. Draw a custom polygon to encompass the area for detection.
- In the "Name" field, you can give a custom name to the zone of interest.
- Tick the "Display on Video" box to visualize the defined area on the live video stream.
- Select the different Object Types (person, vehicle, animal, unknown) that you would like to detect within each defined area.
- Select which event to trigger: Enter & Exit, Enter Only & Exit Only
- Additional zones can be defined by clicking "+ Add".
Loitering Detection
Detects objects that stay in the defined area longer than a specified time. An event will be triggered when a target object remains in the area for a duration of x seconds.
When a loitering event is triggered, the bounding box of the object that caused the event is visually highlighted in the live view and in recorded video playback, making it easy to identify which object triggered the alert.

Configuration steps
- Open XProtect Smart Client.
- Click on the CVEDIA logo at the top right corner of a video stream.
- Click directly on the image under "New Trigger" to define the detection zone. Draw a custom polygon to encompass the area for detection.
- In the "Name" field, you can give a custom name to the zone of interest.
- Tick the "Display on Video" box to visualize the defined area on the live video stream.
- Select the different Object Types (person, vehicle, animal, unknown) that you would like to detect within each defined area.
- Set the duration threshold for triggering events.
- Additional zones can be defined by clicking "+ Add".
Object Removed Detection
Detection of objects being removed from a specified area, indicating potential theft.

Configuration steps
- Open XProtect Smart Client.
- Click on the CVEDIA logo at the top right corner of a video stream.
- Click directly on the image under "New Trigger" to define the zone of interest. Draw a custom polygon to encompass the area for detection.
- In the "Name" field, you can give a custom name to the zone of interest.
- Tick the "Display on Video" box to visualize the defined area on the live video stream.
- Set the duration threshold for triggering events.
- Additional zones can be defined by clicking "+ Add".
Object Left Detection
Detection of objects being left in a specified area, indicating potential delivery or object abandonment.

Configuration steps
- Open XProtect Smart Client.
- Click on the CVEDIA logo at the top right corner of a video stream.
- Click directly on the image under "New Trigger" to define the zone of interest. Draw a custom polygon to encompass the area for detection.
- In the "Name" field, you can give a custom name to the zone of interest.
- Tick the "Display on Video" box to visualize the defined area on the live video stream.
- Set the duration threshold for triggering events.
- Additional zones can be defined by clicking "+ Add".
Crowding Detection
Detects when the number of objects within a defined area at any given time reaches a set threshold. For instance, it could be a useful feature to detect a sudden increase of people in a queue in front of an ATM or in a commercial environment.

Configuration steps
- Open XProtect Smart Client.
- Click on the CVEDIA logo at the top right corner of a video stream.
- Click directly on the image under "New Trigger" to define the detection zone. Draw a custom polygon to encompass the area of interest.
- In the "Name" field, you can give a custom name to the zone of interest.
- Tick the "Display on Video" box to visualize the defined area on the live video stream.
- Select the different Object Types (person, vehicle, animal, unknown) that you would like to detect within each defined area.
- Specify the minimum number of objects required to trigger an event.
- Additional zones can be defined by clicking "+ Add".
Tailgating Detection
The tailgating feature detects if more than one object crosses a virtual line during a predefined time interval. This feature could be useful for detection of multiple individuals or vehicles following each other in close proximity to gain access to a secured area.

Configuration steps
- Open XProtect Smart Client.
- Click on the CVEDIA logo at the top right corner of a video stream.
-
Click directly on the image under "New Trigger" to define the zone of interest. Draw a custom polygon to encompass the area for detection.
-
Click once to create new points of the line, then click on the last point to end it.
-
Define the direction of movement for object tracking. Click the Arrows to choose which direction you would like to use to trigger events
-
In the "Name" field, you can give a custom name to the virtual line.
- Tick the "Display on Video" box to visualize the virtual line on the live video stream.
- Set the duration threshold for triggering events.
- Additional zones can be defined by clicking "+ Add".
Line Crossing
Detects objects that cross a defined line. You have the option to create a multi-segment virtual line. This feature allows you to select the direction in which you intend to monitor the movement of objects.

Configuration steps
- Open XProtect Smart Client.
- Click on the CVEDIA logo at the top right corner of a video stream.
-
Click directly on the image to create a virtual line.
-
Click once to create new points of the line, then click on the last point to end it.
-
Define the direction of movement for object tracking. Click the Arrows to choose which direction you would like to use to trigger events.
-
In the "Name" field, you can give a custom name to the zone of interest.
- Tick the "Display on Video" box to visualize the virtual line on the live video stream.
- Additional zones can be defined by clicking "+ Add".
Fallen Person Detection
Detects individuals who have fallen within defined areas, signaling possible safety incidents.
When a fallen person event is triggered, the bounding box of the detected individual is visually highlighted in the live view and in recorded video playback, making it easy to identify the person involved.
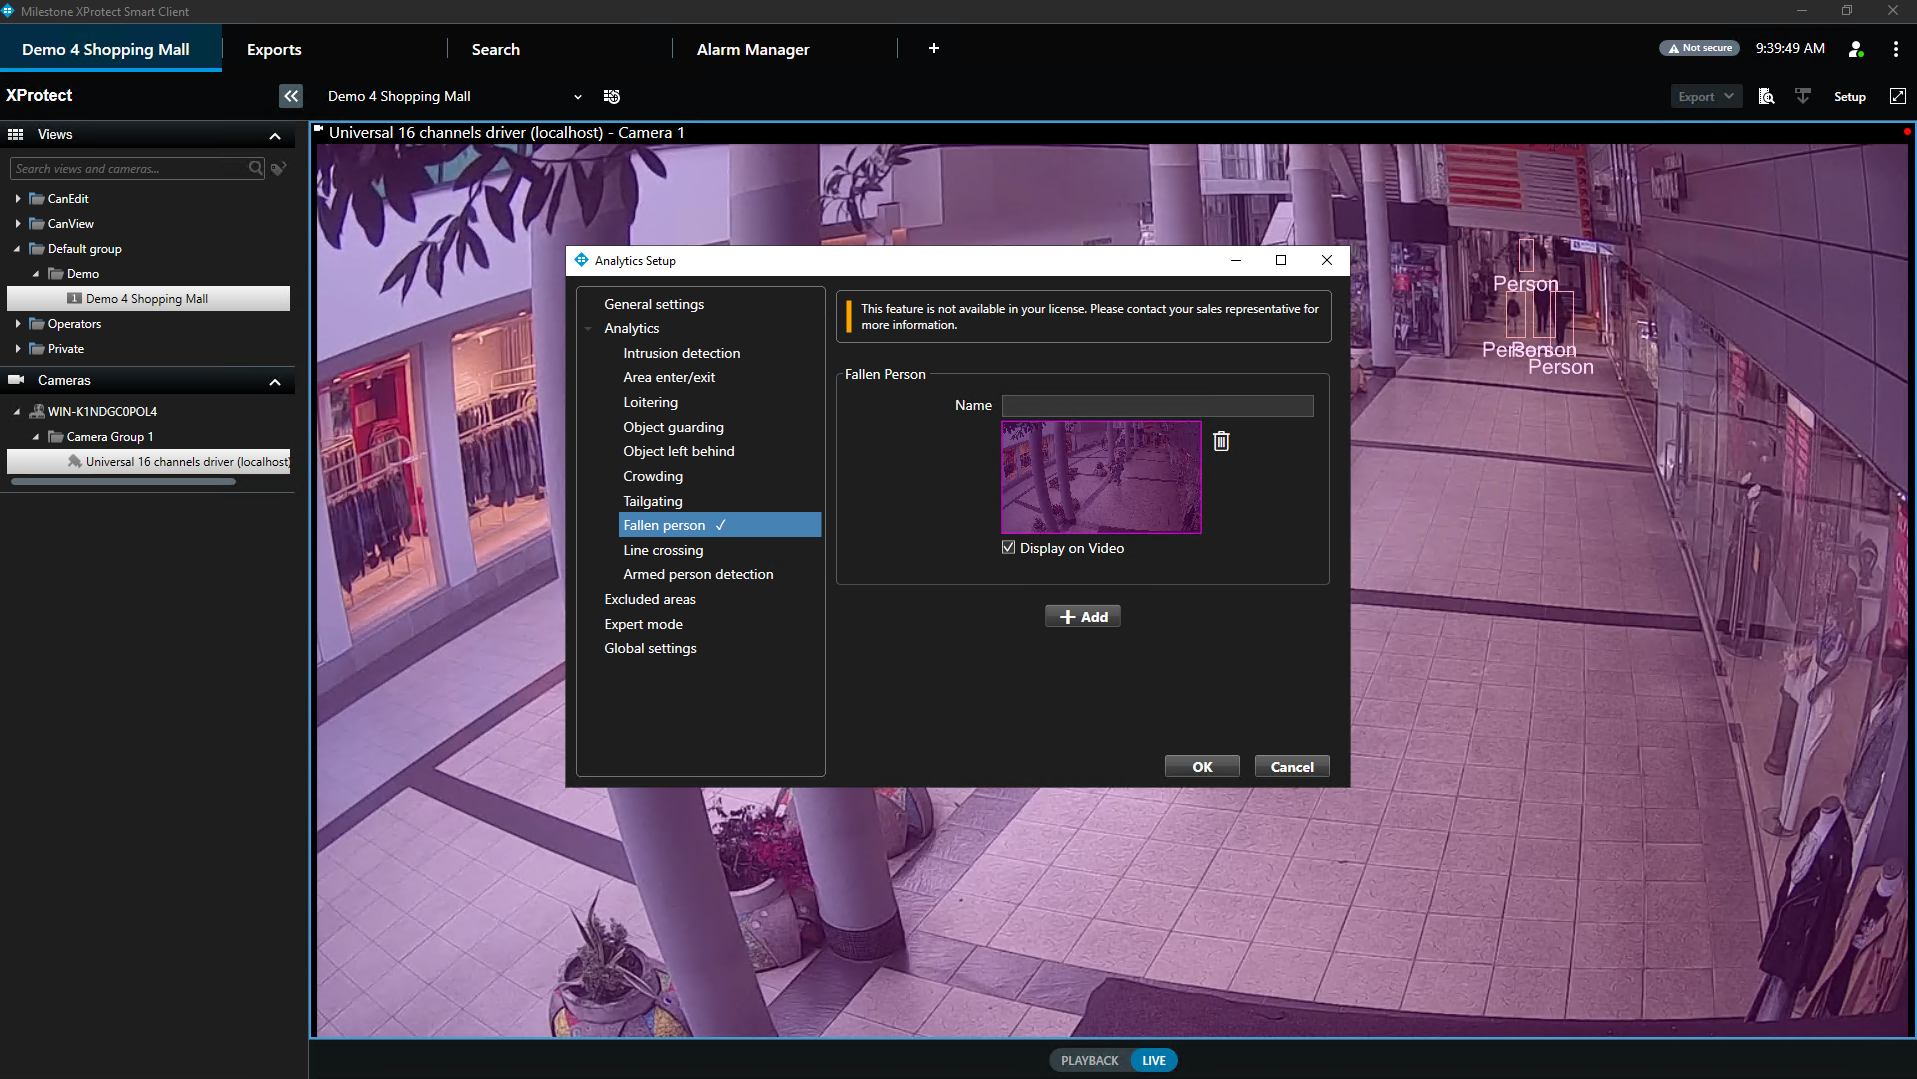
Configuration steps
- Open XProtect Smart Client.
- Click on the CVEDIA logo at the top right corner of a video stream.
- Click directly on the image under "New Trigger" to define the zone of interest. Draw a custom polygon to encompass the area for detection.
- In the "Name" field, you can give a custom name to the zone of interest.
- Tick the "Display on Video" box to visualize the defined area on the live video stream.
- Set the duration threshold for triggering events.
- Additional zones can be defined by clicking "+ Add".
Armed Person Detection
Detects individuals equipped with fire weapons that move inside a defined area, providing alerts for security action.
When an armed person event is triggered, the bounding box of the detected individual is visually highlighted in the live view and in recorded video playback, making it easy to identify the person involved.
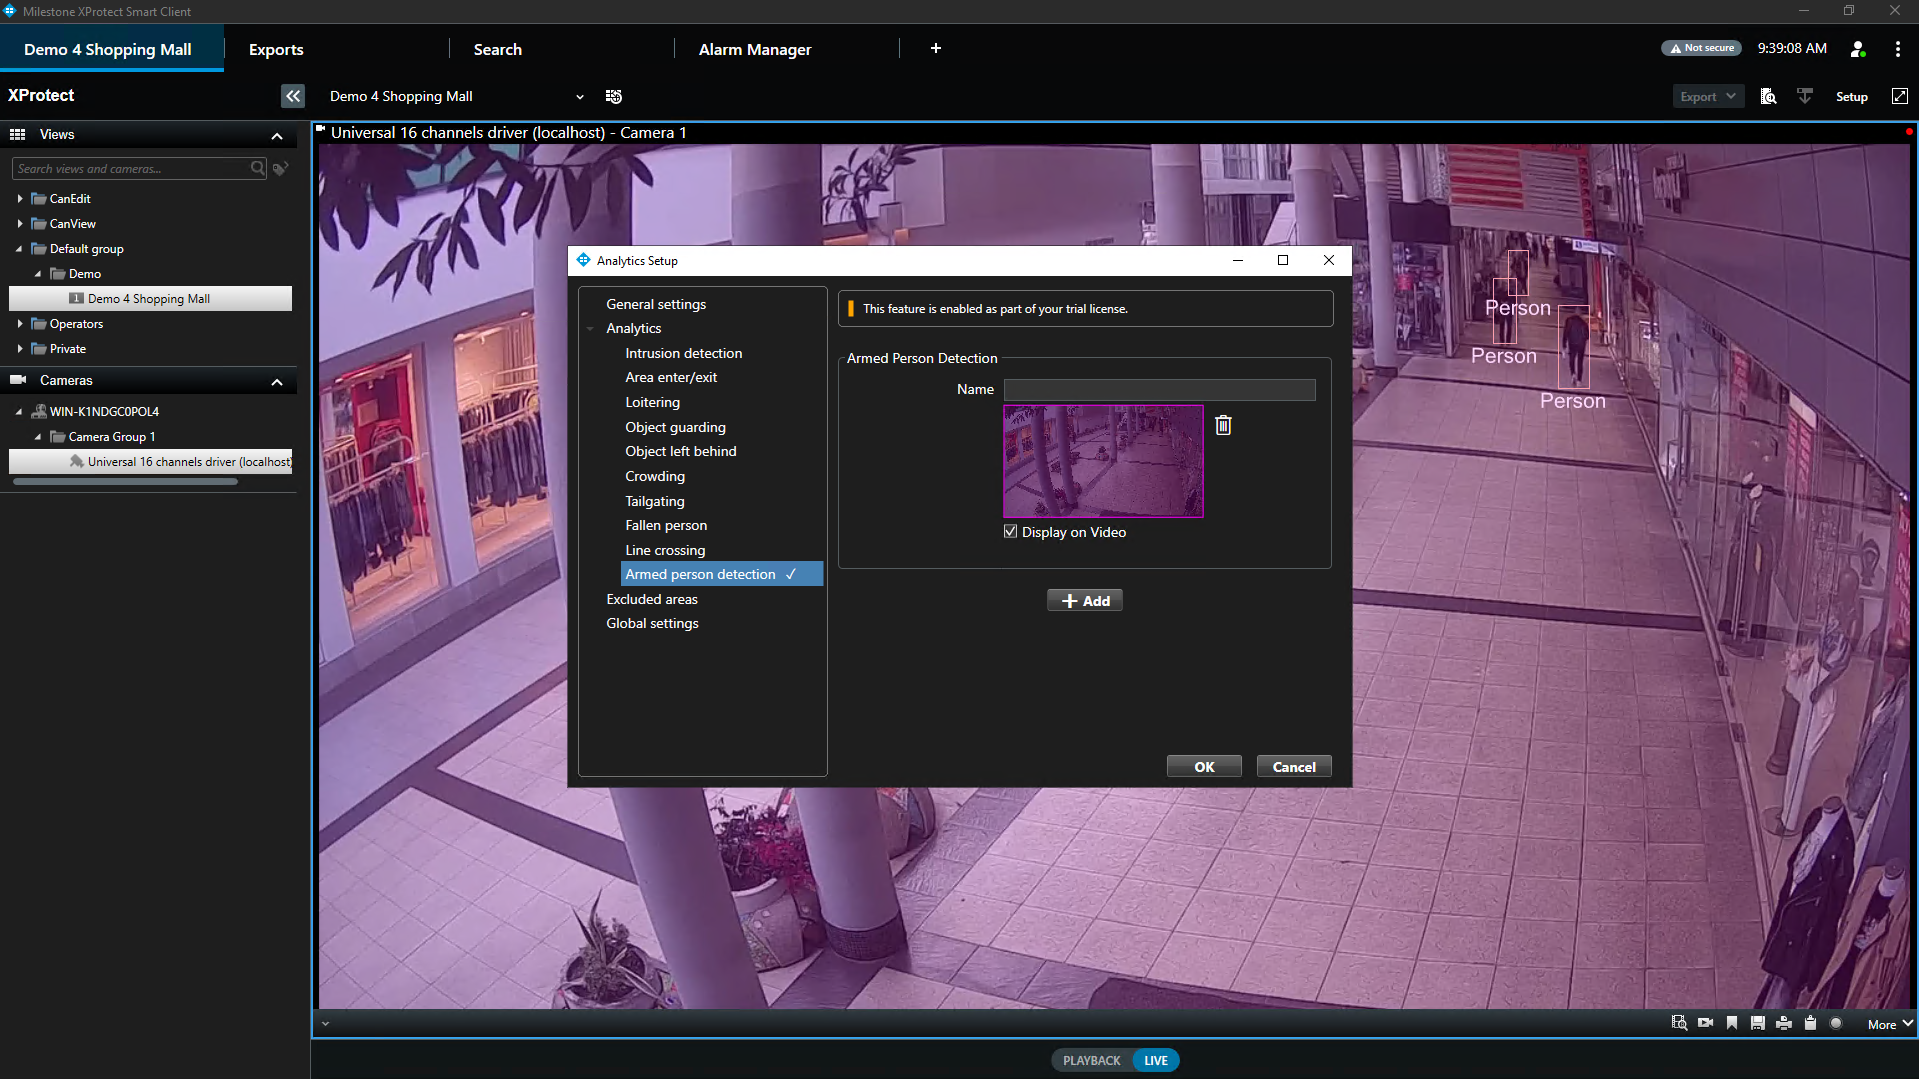
Configuration steps
- Open XProtect Smart Client.
- Click on the CVEDIA logo at the top right corner of a video stream.
- Click directly on the image under "New Trigger" to define the zone of interest. Draw a custom polygon to encompass the area for detection.
- In the "Name" field, you can give a custom name to the zone of interest.
- Tick the "Display on Video" box to visualize the defined area on the live video stream.
- Set the duration threshold for triggering events.
- Additional zones can be defined by clicking "+ Add".
License Plate Recognition
Records and translates license plates that enter the scene into searchable data using OCR for later analysis.

Configuration steps
- Open XProtect Smart Client.
- Click on the CVEDIA logo at the top right corner of a video stream.
- In the General Settings section activate the toggle for Enable LPR.
Additional Settings
General Settings
The main page of the analytics settings window contains the options that apply to all analytic scenarios for this camera stream.
Camera Rotation
The camera rotation feature lets users adjust the orientation of the stream to match the physical rotation of the camera (e.g., when the camera is installed at an angle or upside down).
Show Picture-in-picture
Displays a small overlay image (picture-in-picture) within the detection thumbnail to highlight important details such as faces or license plates. This ensures that key information stands out for quick identification.
Global Settings
Global settings are applied universally to all channels where analytics are activated.

Profile Selection
The Profile setting allows users to adjust the AI processing mode to best match the camera environment and available system resources. Selecting the right profile helps balance detection accuracy with computational efficiency.
Hi-Res Profile:
- Default and recommended setting.
- Unless overwritten in the Expert Settings, utilizes the camera stream closest to 2MP (about Full HD 1920x1080) resolution
- Runs AI models with a larger input size, allowing for higher detection accuracy on crowded environments or distant targets.
Standard Profile:
- Unless overwritten in the Expert Settings, utilizes the camera stream closest to 0.3MP (about VGA 640x480) resolution.
- Provide optimal performance while maintaining high accuracy for typical security analytics.
- Offers a balanced approach to system performance and detection precision.
Enable Statistics
Displays detailed, real-time analytics information as an overlay in the top-left corner of the camera view.

This overlay can be useful for inspecting the performance of the analytics and ensuring that the system is functioning as expected.
Enable Expert Mode
Reveals the Expert Mode menu in the left panel for advanced configuration.
Expert Mode Settings

Max AI Resolution
The Max AI Resolution setting allows you to define the maximum resolution that the AI processes. By default, this value is determined by the profile specified in the Global Settings, but it can be adjusted to meet specific requirements.
- If a resolution higher than the camera's native resolution is set, the plugin will automatically default to the camera's maximum supported resolution.
- Increasing the resolution can improve the detection in crowded environments or of distant targets.
Important
Only increase the resolution if absolutely necessary, as higher resolutions may significantly impact system performance
AI Tracking Speed
The AI Tracking speed feature enables users to adjust the frame rate at which the AI processes data.
Modifying this from the default setting may impact server performance and reduce the number of AI streams that can run simultaneously on the same device.
Default: 5 FPS - Optimized for most of the security surveillance use cases.
Fast: 10 FPS - Optimized for tracking faster moving targets (e.g. cyclists).
Very Fast: 15 FPS - Optimized for capturing targets that move very fast (e.g. electric scooters).
Choose the appropriate speed based on the tracking requirements and the server's capacity to handle the additional load.
An additional reason to increase the AI Tracking Speed is to improve the detection of very difficult targets that are clearly visible for only a few frames due to occlusions, lighting conditions, or compression artifacts.
Detection Sensitivity
Increasing detection sensitivity improves the ability to detect challenging targets (e.g., smaller, occluded, or affected by lens noise) but may lead to more False Positives. Change "Detection Sensitivity" settings to "High" if the system misses events involving small objects or in busy scenes.
Movement Sensitivity
The Movement Sensitivity setting determines how the system detects motion within the camera's view. This setting can be adjusted to account for environmental factors such as rain, snow, camera noise, or light reflections, which might trigger false motion detections.
Low Sensitivity:
- Reduces false motion detections caused by environmental conditions.
- Suitable for minimizing noise in challenging environments.
High Sensitivity:
- Improves detection of fast-moving objects or objects that are visible for only a short duration.
- May increase False Positives under certain environmental conditions.
Creating Rules and Alerts
Using the XProtect Management Client, you can configure new rules and alerts triggered by CVEDIA-RT Analytic Events.
For detailed information on configuring specific rules and alert actions in Milestone XProtect, please refer to the Milestone XProtect documentation or consult with your XProtect system administrator.